If you have a motherboard that uses UEFI instead of a legacy BIOS, use the following process to update the firmware on your LSI controller. These steps will work for both an onboard controller or an add-in card. If you run into issues with any of the steps, please post a message here or in the Discord so someone can assist you before going any further.
PLEASE NOTE this specific process will only work with LSI branded cards, and only if you are updating a controller with firmware for the same chipset (like from the SAS2008 IR mode to IT mode). There are more advanced methods for cross-flashing cards from another manufacturer like Dell, IBM, HP, etc., as well as methods for cross-flashing from one LSI chipset to another (like from the SAS2208 chipset to the SAS2308 chipset), but they are not covered in this guide. If you are unsure what chipset your card uses, post info about the card in here or in Discord before you proceed.
0. Download the firmware and other files
- There are three separate files you will need to download from Broadcom; the EFI flashing tool, the UEFI ROM, and the firmware image. The tool and ROM are universal, but there are different firmware images depending on which specific card you have. If you don’t know the model of your card, go here for tips on identifying your card.
| File Description | File Link |
|---|---|
| UEFI Flashing Utility | https://docs.broadcom.com/docs/12350820 |
| UEFI ROM Image | https://docs.broadcom.com/docs/12348628 |
| SAS2008 Firmware (9201-8i/9211-8i Cards) | https://docs.broadcom.com/docs/12350504 |
| SAS2116 Firmware (9201-16e Cards) | https://docs.broadcom.com/docs/12350418 |
| SAS2308 Firmware (9207-8i Cards) | https://docs.broadcom.com/docs/12350493 |
- In addition to the files from Broadcom, you might need a UEFI shell if your motherboard doesn’t have a built-in shell. You can download the shell from GitHub here
1. Obtain and format your USB thumb drive
-
You will need a thumb drive 32GB or smaller. If you don’t already have one, I recommend the Kingston Data Traveler SE9 Amazon.com
-
Insert the drive into your computer, and format it to FAT32. The process will wipe anything that’s currently on your drive, so make sure you back up anything on the drive you want to keep
2. Add firmware files to the USB thumb drive
-
From the
Installer_P20_for_UEFI.zipfile, copy the filesas2flash.efifrom theInstaller_P20_for_UEFI\sas2flash_efi_ebc_relfolder to the root folder of the thumb drive -
From the
UEFI_BSD_P20.zipfile, copy thex64sas2.romfrom the folderUEFI_BSD_P20\uefi_bsd_rel\Signedinto the root folder of the thumb drive -
For the firmware, the filename will differ, but it will always be in a subfolder of the
Firmwarefolder. Look for the folder name that ends inIT. Inside that folder there should only be one file with a.binextension. Copy that file to the root folder of the thumb drive. Also, make a note of the name of this firmware image, you will need to remember it for later. -
Also, in the same download as the firmware file, copy the file
mptsas2.romfrom thesasbios_relfolder to the root folder of the thumb drive.
3. Add UEFI Shell to flash
-
Finally, if you need the UEFI shell, you’ll need to copy it to a few locations. The articles I researched when writing this guide had some conflicting information about where the shell needs to go, so it’s easiest to just copy it to all of the locations, unless you know for sure which specific file and folder your motherboard looks for.
-
Create the folders
boot\efiandefi\booton your flash drive. -
Copy the file
Shell_full.efito both folders, as well as to the root folder of the thumb drive, and rename it toBootX64.efi -
Copy the file
Shell_full.efito both folders and the root folder again, and this time rename it toShellX64.efi -
Just to clarify - when you’re done you will have copied the same file to the thumb drive 6 times, in 3 folders, named both
BootX64.efiandShellX64.efi
4. Boot to the UEFI shell
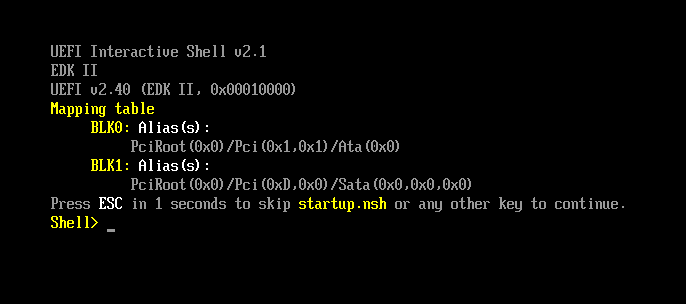
- If you have any hard drives or other bootable devices plugged into the system you will be using to flash your controller, unplug them temporarily. Plug in the thumb drive and turn on the computer. It should boot to the UEFI shell and you should see something similar to this screenshot:
-
If you get an error about no boot device or something similar, you may need to disable secure boot in your BIOS, or update the boot order to include the USB stick. These steps vary from motherboard to motherboard, so consult your manual for the exact process.
-
You should see a list of all the drives the UEFI shell can detect, including your thumb drive. Change to the drive’s path by typing in the mapped name including the colon and pressing Enter (example
BLK0:in the image). If you entered it correctly, the prompt will change fromShell>tofs0:(or whatever name your system mapped for the drive). -
Type
dirand hit Enter again, you should see a listing of the files you copied onto the thumb drive. If you don’t see the files, double-check the map and try changing to any other mapped drives and repeating thedircommand until you find the correct path.
5. Flashing a single card with the latest firmware
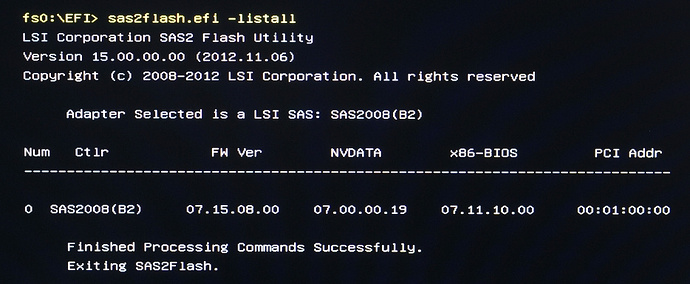
- First we need to double-check that the card is showing up properly. Run
sas2flash.efi -listall. You should see a table similar to this:
-
If you get an error that no controllers could be found, make sure the controller was completely enabled in the BIOS (for onboard controllers) or power down and reseat the controller (for add-in cards). If the list shows more than one controller, jump to step 6 for specific instructions
-
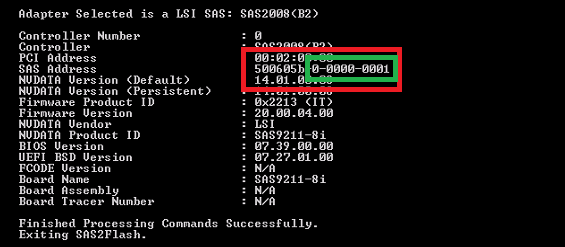
Next you’ll need to get the address of the SAS controller. Run
sas2flash.efi -listand write down the full 16 digit SAS Address (highlighted in red).
-
Run
sas2flash.efi -o -e 7to erase the current firmware from the card. -
Run
sas2flash.efi -o -f <firmware name>.bin -b x64sas2.rom -b mptsas2.rom, substituting the name of the firmware image you wrote down in step 3 -
Run
sas2flash.efi -o -sasaddhi XXXXXXXreplacingXXXXXXXwith the first seven digits of the SAS address, which should start with500. The system should prompt you to enter the remaining 9 digits of the address (the portion highlighted in green), go ahead and enter it. -
Your card should be fully flashed now. You can shut down, remove the flash drive, and proceed with the rest of your build.
6. Flashing multiple cards
-
If you have multiple SAS controllers installed, you will need to add one parameter to the flashing commands, and repeat the process for every controller. It’s best to do all the steps for a single controller before moving on to the next.
-
Get the SAS address of the controller you are working on. Run
sas2flash.efi -c X -list, replacing theXwith the card number from above (examplesas2flash.efi -c 0 -list). Write down the full 16-digit number (highlighted in red)
-
Run
sas2flash.efi -c X -o -e 7, again replacing theXwith the card number, to erase the current firmware from the card. -
Run
sas2flash.efi -c X -o -f <firmware name>.bin -b x64sas2.rom -b mptsas2.rom, substitutingXwith the card number, and replacing<firmware name>with the name of the firmware image you wrote down in step 3 -
Run
sas2flash.efi -c X -o -sasaddhi YYYYYYY, withXas the card number andYYYYYYYthe first seven digits of the SAS address, which should start with500. The system should prompt you to enter the remaining 9 digits of the address (the portion highlighted in green), go ahead and enter it. -
The card is now fully flashed. Repeat these steps for the other controller(s) in your system. Once all controllers have been flashed, you can power down, remove the USB stick, and proceed with the build.
12/26/2019 Update - I reformatted this post slightly with collapsible steps to make it easier to track your progress, and re-worded the warnings at the top for clarity about which cards will and won’t work with this guide.


