Unraid 6.9 Update
With the release of unraid 6.9 comes the ability to define multiple cache pools, which eliminates the need for moving your Docker data to an unassigned device. If you’ve already followed this guide and your Docker data is on an unassigned device, there’s no need to change things back. However, if you’re reading this guide for the first time, and you’re using unraid 6.9 or higher, I would recommend not using this guide and instead creating a separate cache pool for your Docker and VM data.
Summary
By default, unraid puts the Docker vDisk image and appdata on your the array, with no caching enabled. This is usually fine for one or two containers, but as you add more containers to the mix, your disk IO can increase and responsiveness for the containers can go down as a result. To fix this, you could set the shares for your Docker image and appdata to always be on the cache drive. This will work, but then you’re using up a chunk of the cache space constantly, and if you ingest a lot of new files frequently, you can run into a disk IO problem again. A better solution is to move the files to an unassigned drive, preferably an SSD. Keeping your Docker files on a dedicated drive can increase responsiveness for any container, but it can be especially helpful if you run containers that work with databases. This article will walk you through the steps needed to move your Docker installation to an unassigned drive.
 WARNING WARNING WARNING WARNING WARNING
This is an advanced topic that uses the terminal to move files, mount disk images, and make manual edits to configuration files. I have tested these commands on my own system successfully, but I am not liable if you break your installation. Please read through this entire guide thoroughly before attempting the process. If you have any questions, please post them here or on the discord and do not proceed until you have been given an answer.
Read Me First
This process assumes you have the array STARTED, and the disk you want to copy the image to is mounted as an unassigned device. If this isn’t the case, ![]() STOP HERE
STOP HERE ![]() and ask for assistance.
and ask for assistance.
In several of the steps below, you will need to enter commands in the terminal. Commands to be entered will be placed in code blocks. There will be some places in these code blocks where you need replace a placeholder with a specific folder or value from your system. Look for words with angled braces around them, like <unassigned_drive> and replace everything, including the angled braces, with the proper value. Be careful not to replace or remove any characters outside the braces.
0. Back up your appdata folder
- I would recommend installing the CA Appdata Backup/Restore plugin from the Apps tab, and running a full backup of your entire appdata folder prior to moving anything. The process shouldn’t take more than a few minutes, and it will give you a safety net just in case you run into a problem. You may also want to consider using the plugin to schedule recurring backups. Regardless of how you backup the folder, make sure the backup is completed before you proceed.
1. Stop all of your running containers
- Save your work in any containers that are running, then go to the Docker tab in the WebUI and click the Stop all button.
2. Disable Docker and grab the current paths
- Go to Settings > Docker, and set Enable Docker to No, then Apply the settings and wait for the page to reload. You’ll notice the Docker tab is no longer showing in the top menu. While you are here, make note if the Docker vDisk location and Default appdata storage location. You will need these paths in a future step. Take a screenshot, or copy them to a notepad to make things easier. Copy the full path including the leading and trailing slashes. If you haven’t changed them from the defaults, they are:
Docker vDisk location:/mnt/user/system/docker/docker.img
Default appdata storage location:/mnt/user/appdata/
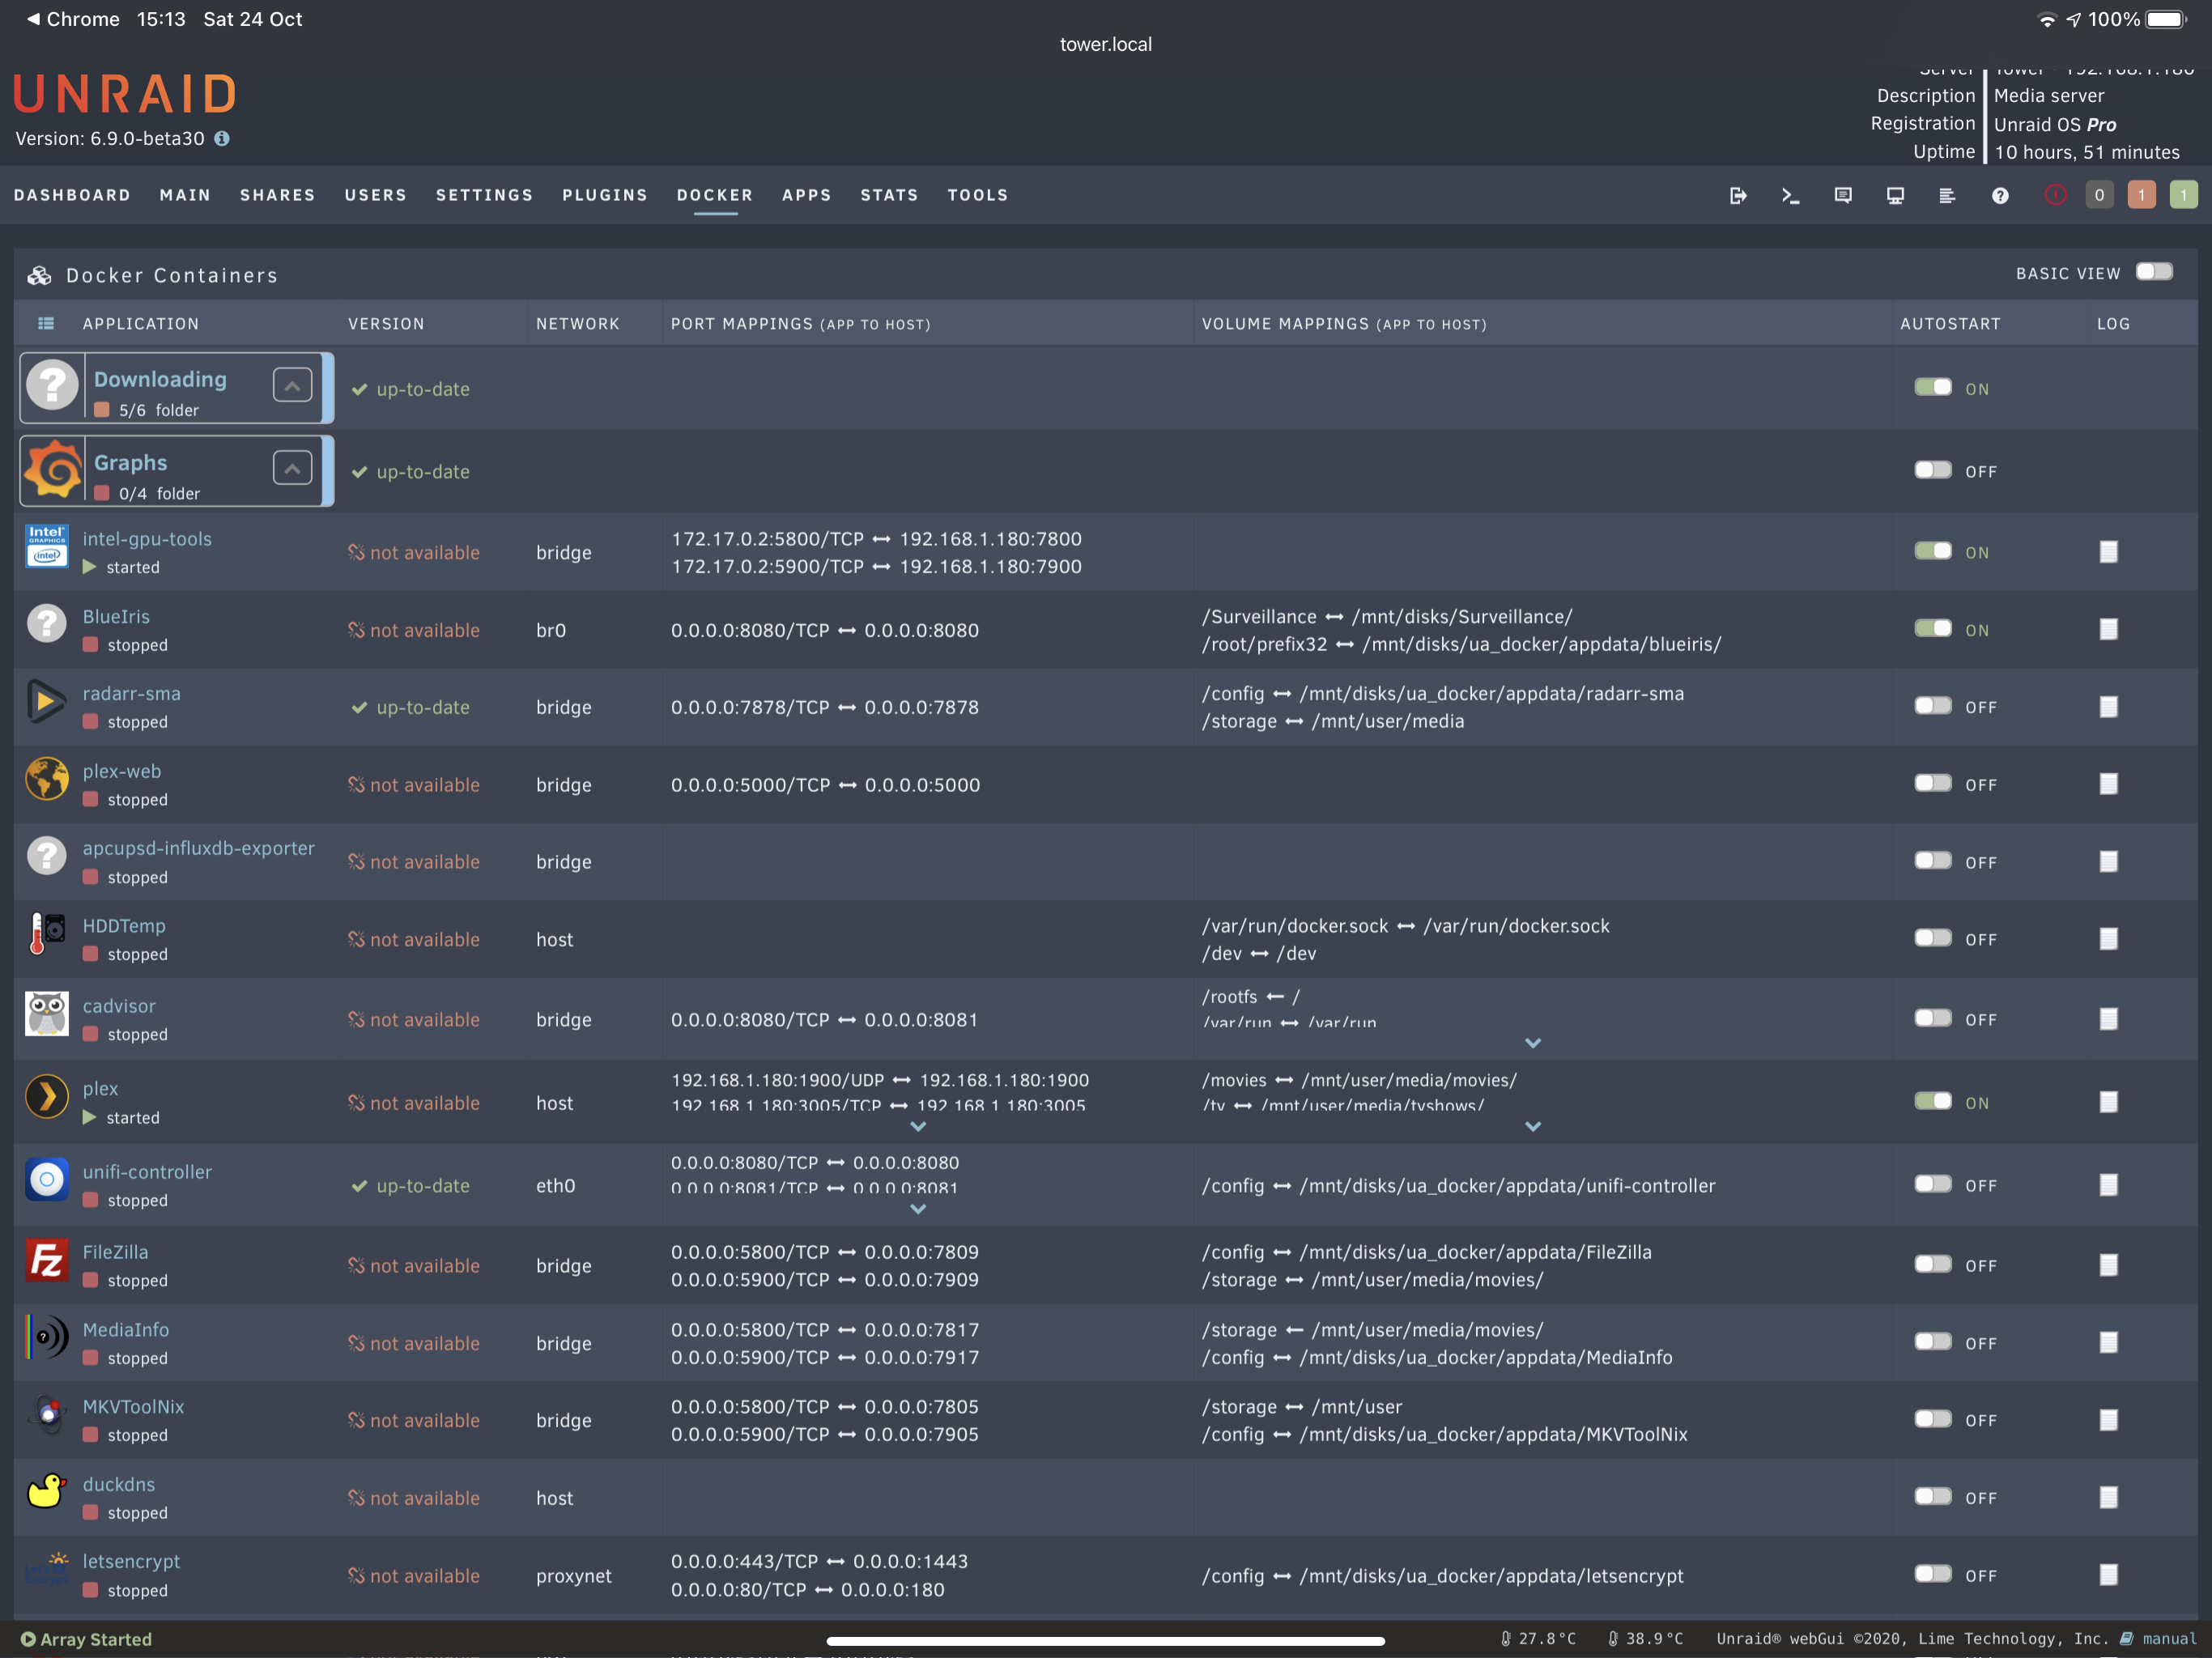
3. Get the unassigned drive name
-
Go to the Main tab and find the name of the unassigned drive you want to use. For example, in this screenshot I have a disk named ua_docker. This drive name is what you will use in all the steps below when they ask for
<unassigned_drive>

4. Open a terminal
- Click the
>_icon in the upper right to open the Web Terminal, or use Putty or your favorite terminal emulator to connect to the server.
5. Create the folder for the Docker vDisk
-
Enter the following command:
mkdir -p /mnt/disks/<unassigned_disk>/system/docker && chown -R nobody.users /mnt/disks/<unassigned_disk>/systemreplacing <unassigned_disk> with the name of the disk from step 3.
6. Move the Docker vDisk image to the new drive
-
Enter the following command:
mv <docker_vdisk> /mnt/disks/<unassigned_disk>/system/docker/docker.imgreplacing <docker_vdisk> with the location you copied in step 2, and <unassigned_disk> with the name of the disk from step 3. This process may take a few minutes depending on how large your Docker image is.
7. Move the appdata folder to the new drive
- Enter the following command:
replacing <default_appdata> with the appdata location from step 2, and <unassigned_disk> with the disk name from step 3. This step may take a while, depending on how many containers you have.mv <default_appdata> /mnt/disks/<unassigned_disk>/
8. Mount the Docker vDisk image
-
Enter the following command:
mkdir /mnt/docker_temp && mount /mnt/disks/<unassigned_disk>/system/docker/docker.img /mnt/docker_tempreplacing <unassigned_disk> with the folder from step 3.
9. Update the container configuration files to reflect the new appdata path
-
Enter the following command:
find /mnt/docker_temp/containers -name '*.json' -exec sed -i -r 's/appdata(.*):(r[ow])"/appdata\1:\2,slave"/g; s+<default_appdata>+/mnt/disks/<unassigned_disk>/appdata/+g' {} \;Replace <default_appdata> with the appdata folder from step 2, and <unassigned_disk> with the disk name from step 3.
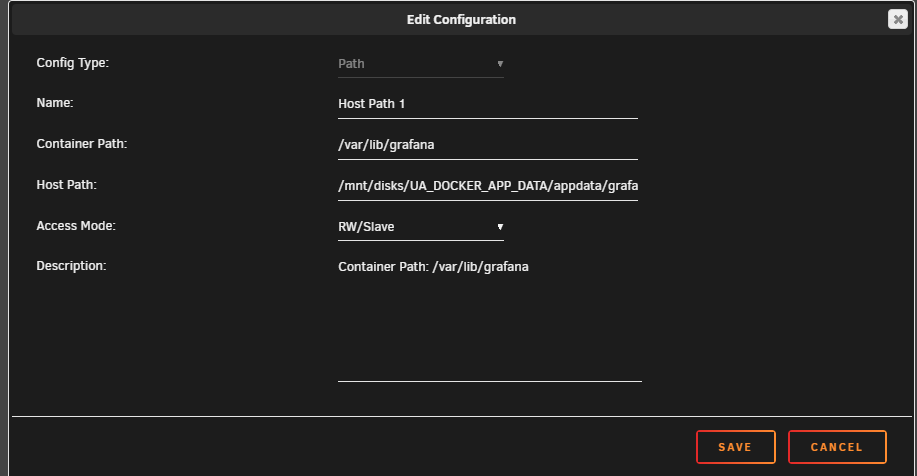
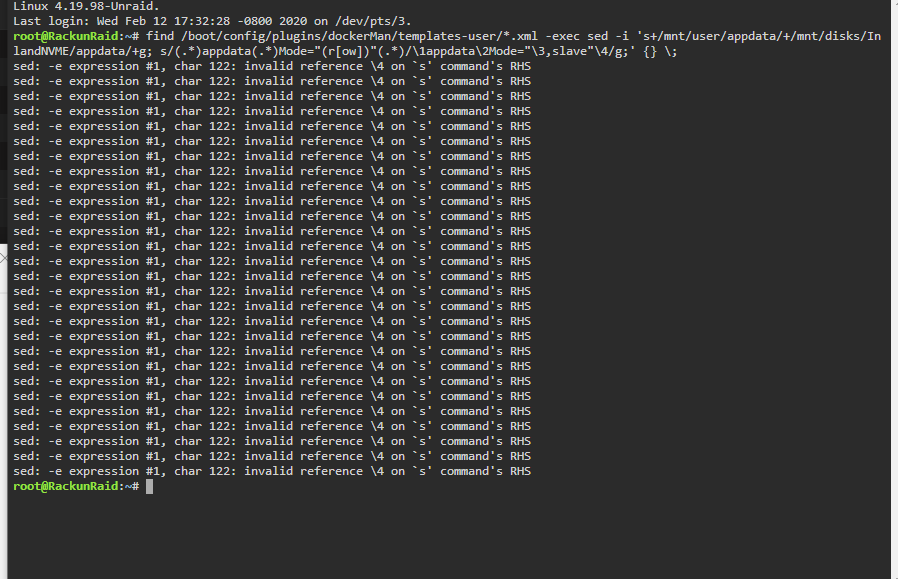
10. Update the dockerMan templates to reflect the new folder
-
Enter the following command:
find /boot/config/plugins/dockerMan/templates-user/*.xml -exec sed -i -r 's+<default_appdata>+/mnt/disks/<unassigned_disk>/appdata/+g; s/(.*)appdata(.*)Mode="(r[ow])"(.*)/\1appdata\2Mode="\3,slave"\4/g;' {} \;Replace <default_appdata> with the appdata folder from step 2, and <unassigned_disk> with the disk name from the beginning.
11. Update Unraid Docker Config
-
Enter the following command:
sed -i 's+/mnt/user/+/mnt/disks/<unassigned_drive>/+g' /boot/config/docker.cfgReplacing <unassigned_drive> with the disk name from step 3.
12. OPTIONAL - Update CA Backup/Restore Appdata
-
If you have the CA Backup/Restore Appdata plugin installed, enter the following command. If you don’t have this plugin installed, skip to the next step:
sed -i 's+/mnt/user/+/mnt/disks/<unassigned_drive>/+g' /boot/config/plugins/ca.backup2/BackupOptions.jsonReplacing <unassigned_drive> with the disk name from step 3.
13. Clean up after yourself
-
Enter the following command:
umount /mnt/docker_temp && rmdir /mnt/docker_temp && exitYou can now close the terminal window.
14. Restart the Docker engine
- Using the WebUI, go to Settings > Docker, change Enable Docker to Yes and click Apply. Wait for the page to load.
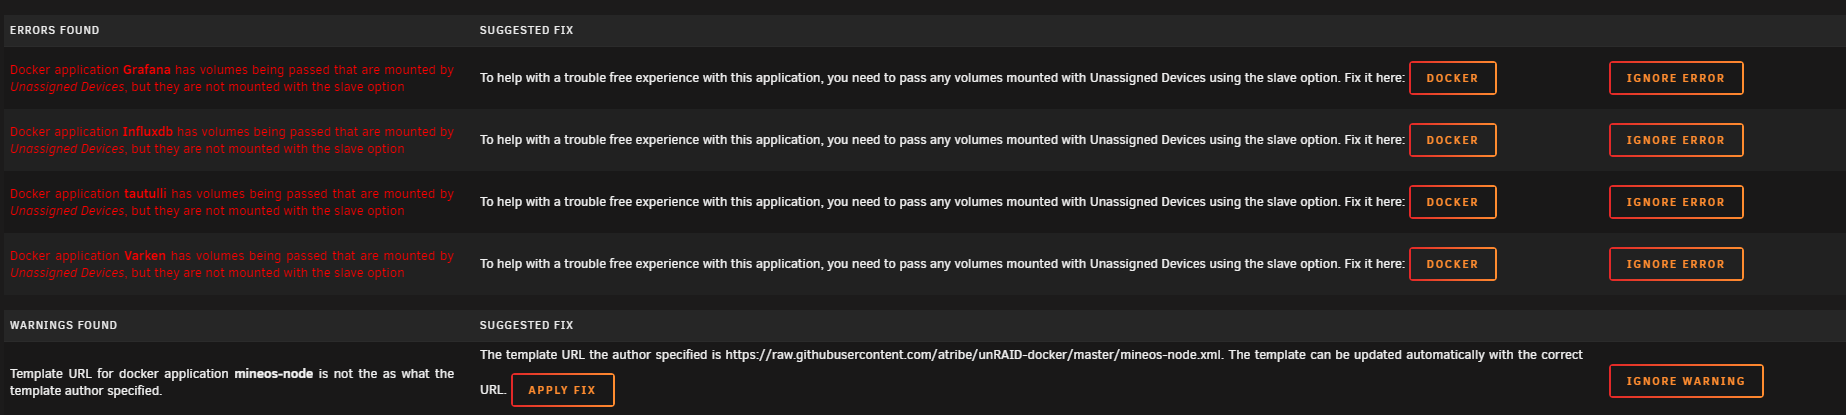
15. Verify your work
- Go to the Docker tab and verify that all of your containers are still listed. You can now start your containers again and verify they’re working.
16. It's Miller Time
- That’s it, you’re done. If your containers are all running, grab a beer or 3 and celebrate. You have successfully moved your Docker installation.
TL;DR Version:
IF your Docker vDisk image and appdata are both in their default locations (/mnt/user/system/docker/docker.img and /mnt/user/appdata respectively), you can use the script below to take a shortcut.
- Back up your appdata folder. Use the CA Backup/Restore Appdata plugin.
- Stop the Docker engine (Settings > Docker > Enable Docker = No > Apply)
- Go to the Main tab and grab the name of the disk you want to use. Even if you already know the name, you need to leave the Docker settings screen for the script to work, so just go to the Main tab.
- Copy the commands below into your favorite text editor
- Search for and replace all instances of
REPLACE_MEwith the drive name from step 2 - Open the terminal window. Copy and paste the commands from your text editor into the terminal one at a time.
- Please note, if you don’t have the CA Backup/Restore Appdata plugin installed, you can skip the second to the last command, the one right above
exit
- Please note, if you don’t have the CA Backup/Restore Appdata plugin installed, you can skip the second to the last command, the one right above
- Start the Docker engine (Settings > Docker > Enable Docker = Yes > Apply)
- Check the Docker tab to verify your containers are all listed, and then start them
mkdir -p /mnt/disks/REPLACE_ME/system/docker && chown -R nobody.users /mnt/disks/REPLACE_ME/system
mv /mnt/user/system/docker/docker.img /mnt/disks/REPLACE_ME/system/docker/
mv /mnt/user/appdata/ /mnt/disks/REPLACE_ME/
mkdir /mnt/docker_temp && mount /mnt/disks/REPLACE_ME/system/docker/docker.img /mnt/docker_temp
find /mnt/docker_temp/containers -name '*.json' -exec sed -i -r 's+/mnt/user/appdata/+/mnt/disks/REPLACE_ME/appdata/+g; s/appdata(.*):(r[ow])"/appdata\1:\2,slave"/g' {} \;
umount /mnt/docker_temp && rmdir /mnt/docker_temp
find /boot/config/plugins/dockerMan/templates-user -name '*.xml' -exec sed -i -r 's+/mnt/user/appdata/+/mnt/disks/REPLACE_ME/appdata/+g; s/(.*)appdata(.*)Mode="(r[ow])"(.*)/\1appdata\2Mode="\3,slave"\4/g;' {} \;
sed -i 's+/mnt/user/+/mnt/disks/REPLACE_ME/+g' /boot/config/docker.cfg
sed -i 's+/mnt/user/+/mnt/disks/REPLACE_ME/+g' /boot/config/plugins/ca.backup2/BackupOptions.json
exit
FAQ
My containers are running fast enough, do I need to do this?
- Nope - if you are happy with how your system is running, there is no need to move the containers.
I just started using unraid, do I really need to go through all of these steps?
- Nope - if you haven’t installed any containers yet, all you have to do is change the paths in the Docker settings to the unassigned drive you want to use.
Why don't you just recreate the Docker vDisk image instead of moving it?
- Sure, you could delete and recreate the image in the new folder, but then you would need to re-download all of the images and recreate all of the containers. Moving a file is much simpler.
My appdata share disappeared after I ran this. How do I get it back?
- When you moved the appdata folder, the share was automatically removed. You’ll need to share the unassigned drive to which you moved the folder. In the main tab, under the unassigned devices category, toggle the “Share” button for the drive you used.
Can I update the unassigned devices plugin if I moved the appdata to an unassigned device?
- Yes. You can still update the plugin, but you need to do one of the following:
- Stop all running containers and the docker engine, and unmount all of your unassigned drives before you run the update
- Reboot your server after you install the update.