Summary
So you’ve read JDM’s QuickSync guide and you’ve decided to switch from your previous “One Server To Rule Them All” approach to a separate NAS and dedicated QuickSync system. You get to the point in the guide where it tells you to create new libraries, and you ask yourself, “Can’t I just copy my libraries from the old server?” Good news! Yes, you can copy your libraries and metadata from one server to another. Is it worth it? That depends. If you have a library with no custom posters, collections, or manually matched media, or if you’re uncomfortable with a Linux terminal window, you’re honestly better off just following JDM’s original guide and letting Plex rebuild your library. But if you’re not afraid of the terminal or you need to keep your custom posters, this guide is for you.
I borrowed most of this guide from JDM’s guide, because 95% of what you’re doing is going to be identical. I just updated the formatting slightly, threw in a few screenshots and added my updates where necessary. As you read through these instructions, please read the commands carefully and make sure your syntax is correct before running each command.
Instructions
0. Configure Unraid
- Enable NFS under
Settings>NFS - Export your media shares. Go to
Sharesand select the share you want to export to linux. - Under
NFS Security SettingschangeExporttoYesandSecuritytoPrivate.- Repeat this step for every media folder you want to share with linux.
- Go to the
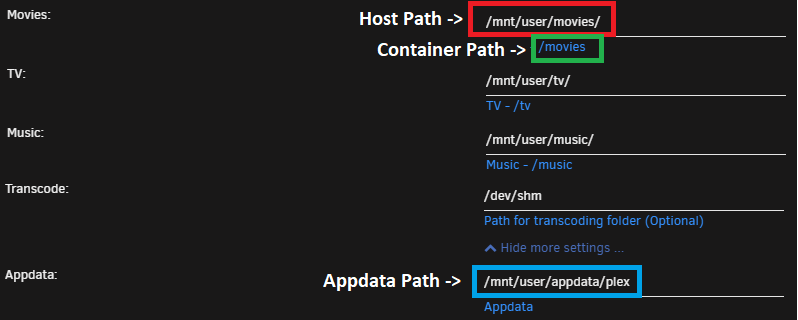
Dockertab and edit your Plex container settings. Make a note of the host and container paths for your media folder(s) and appdata folder. You will need them later. Here’s a screenshot of my paths for reference:
- Close the container settings without changing anything, then stop the Plex container. You can’t have it running when you transfer the data to the new system.
1. Install and Configure Ubuntu
I differ from JDM here, I prefer to use Ubuntu server, where he recommends Ubuntu desktop. My reasoning is once Plex is installed you shouldn’t really need to interact with the system locally outside of an occaisonal update, so why waste resources running a GUI that’s not going to be used? But I will leave that decision up to you and provide links to both installation images.
Ubuntu Server: http://releases.ubuntu.com/20.04/ubuntu-20.04-live-server-amd64.iso
Ubuntu Desktop: http://releases.ubuntu.com/20.04/ubuntu-20.04-desktop-amd64.iso
-
Make a bootable install disk using Rufus on a Windows machine, using an empty flash drive 8GB or larger.
-
Boot to the USB drive on your new server and go through the installation process.
- You can stick with the defaults on nearly all of the steps. If you opted for Ubuntu server, you will need to enable the OpenSSH server when you get to that step, but you won’t need any of the other optional software. If you choose Ubuntu desktop, I’d recommend the minimal install to avoid wasting space on games and other programs that you won’t use.
-
Most of the remaining steps in this guide are completed in a terminal window. If you installed Ubuntu server, you can either run the commands directly on the machine, or you can use a remote terminal emulator program such as Putty. I would recommend grabbing Putty even if you don’t use it now, since it will come in handy for future maintenance on the system. If you installed Ubuntu desktop, there is a built-in terminal emulator.
-
First you will want to download and install any updates that have been released since the installation image was created. In your terminal window, enter the following command all on a single line.
sudo apt update && sudo apt upgrade -y-
One word of warning before we continue. When you run this command, it will prompt you for a
[sudo] password. Before you enter your password, a quick security disclaimer. Thesudocommand lets you run things as the privileged “root” user, without having to log in as root. Since the root user has no security restrictions, if you run the wrong command as root, you could potentially damage your Ubuntu installation. So, like any guide you read on the Internet, please be cautious before running any command on your system. If you don’t fully understand what the command does, do some research before you hit that Enter key. I would recommend pasting the command in explainshell.com which will break down what every part of the command does. -
When you run the
sudocommand, it will usually prompt you for a password. This is the same password you created when you installed the OS. After you’ve entered your password once, the system will remember that you are authenticated for a period of time, 15 minutes by default on Ubuntu installations. -
Please note, all commands and folders in linux are CaSe SeNsItIvE, so make sure you enter the commands exactly as written
-
-
Once the updates have finished, run the following command to install the NFS utilities that allow you to mount the folders from your unraid box.
sudo apt install -y nfs-common
2. Prepare and Mount Network Share Locations
-
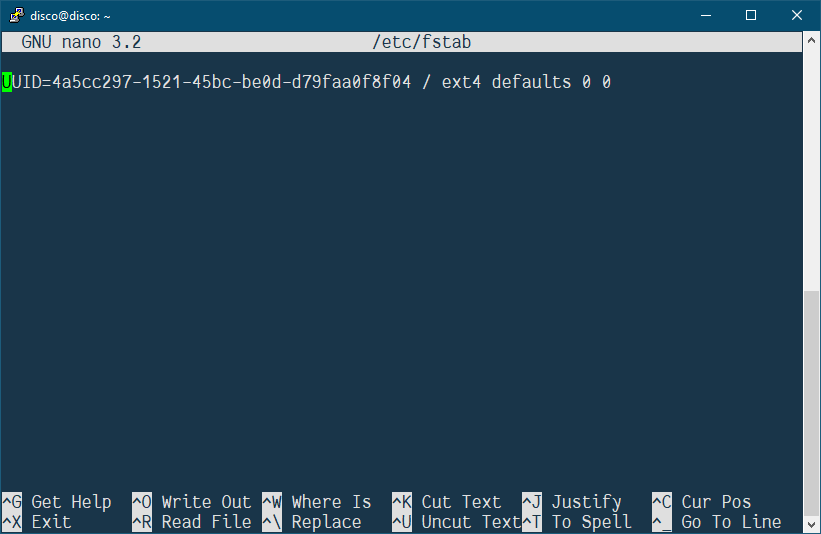
You need to edit the filesystem table file (
/etc/fstab) to add entries for the NFS shares on your unraid box. The easiest way to do this in the terminal is with thenanotext editor. Enter the following:sudo nano /etc/fstab. Your screen should look something like this:
-
You can use the arrow keys on your keyboard to navigate in this screen. Go down past all of the lines that are in there currently so you can add your new entries to the bottom of the list.
-
Grab that list of media paths you saved from step 1. For each media path in that list, enter a line like the following:
<server_ip>:<unraid_host_path> /<unraid_container_path> nfs defaults,noatime 0 0- For example, using the paths from my screenshot in step 1, here’s how I would enter them:
10.0.0.172:/mnt/user/movies /movies nfs defaults,noatime 0 0 - The forward slashes
/are important, make sure you enter them exactly as you see them in your container settings
- For example, using the paths from my screenshot in step 1, here’s how I would enter them:
-
Once you’ve entered your paths, your screen should look something like this:
-
Next, press
Ctrl+O(Letter o) and you will see a promptFile Name to Write: /etc/fstab. Just hit Enter here to accept the default. Then, pressCtrl+Xto close the text editor. -
Now that the paths are added to the filesystem table, you need to create local folders for each media folder you added.
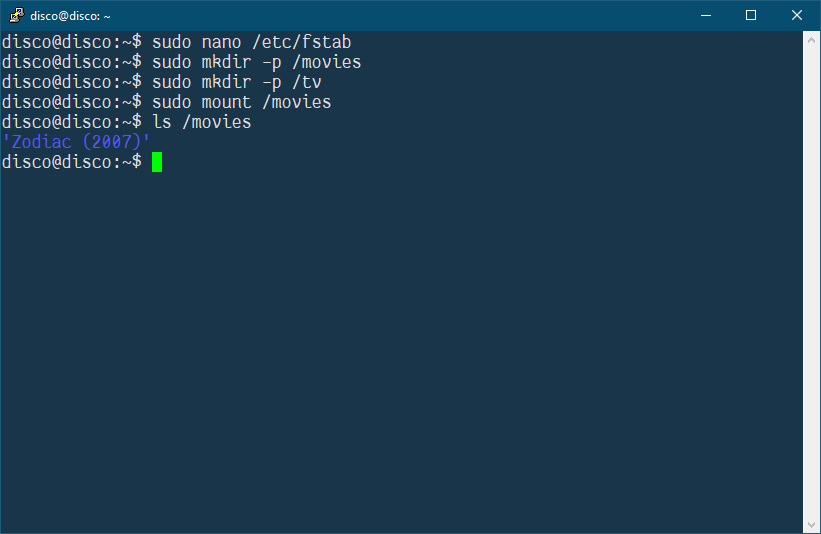
- Enter the following
sudo mkdir -p /<container_path>once for each media folder you have. For example, I enteredsudo mkdir -p /moviesfor my movies folder.
- Enter the following
-
Once that’s finished, test mounting one of the folders.
- Enter the following
sudo mount /<container_path>for just one of the folders. For example, I enteredsudo mount /movies - If you didn’t get an error message, type
ls /<container_path>and verify that your media shows on the screen, like this:
- Enter the following

3. Install Plex
-
Download and install Plex for Linux here.
- If you were using the Plex Pass install in unraid, make sure you enable that option before you download.
- Choose the
Ubuntu (16.04+) / Debian (8+) - Intel/AMD 64-bitdownload. - If you installed the server version of Ubuntu, you’ll need to download the installer on another system temporarily and then copy it to your server. The quickest way to do this is to copy it to your Unraid server temporarily, since you already have your media paths shared and can just copy it over the network. Place it in the media folder you used in the previous step for testing NFS mounting. If you chose the desktop version, you can download directly on the machine using Firefox. Please note that Firefox will want to open it by default, make sure you change it to save the file instead.
-
However you downloaded the installer, the next step is installing Plex. Install Plex using one of the following commands:
- Ubuntu Desktop:
sudo dpkg -i ~/Downloads/plexmediaserver_<version>_amd64.deb - Ubuntu Server:
sudo dpkg -i /<container_path>/plexmediaserver_<version>_amd64.deb - Here’s a quick tip. You can use the
Tabkey to autocomplete files and commands in the linux terminal. So, if my Plex installer was in the/moviesfolder, I could typesudo dpkg -i /movies/plexand then hitTaband it should fill in the rest of the filename automatically. If there is more than one file matching what you have typed so far, the terminal will beep instead of completing it. You can hit tab a couple more times to display all the files that match what you’ve typed. Then, enter in a few more characters of the file you’re intending to use and hitTabagain to try autocompleting it.
- Ubuntu Desktop:
-
Once Plex has been installed, you need to temporarily stop the Plex server by entering:
sudo systemctl stop plexmediaserver
4. Migrate your Metadata
-
Before you can copy the metadata from your unraid install, you need to remove the existing Plex metadata folder. Run the following command:
sudo rm -rf /var/lib/plexmediaserver/Library(Note the capital L in Library) -
Next, copy the metadata folder from your unraid install using rsync, using the following command:
sudo rsync -azvh root@<unraid_IP>:/<plex_appdata_location>/ /var/lib/plexmediaserver/-
The trailing slashes are important on both paths, for example:
/mnt/user/appdata/plex/ -
This process may take some time, you’ll see a ton of files scrolling by as it syncs them from unraid to ubuntu. Once rsync has completed, it will show you the totals of what was transferred and transfer speed. If there were any errors in transferring the data, it will show those as well.
-
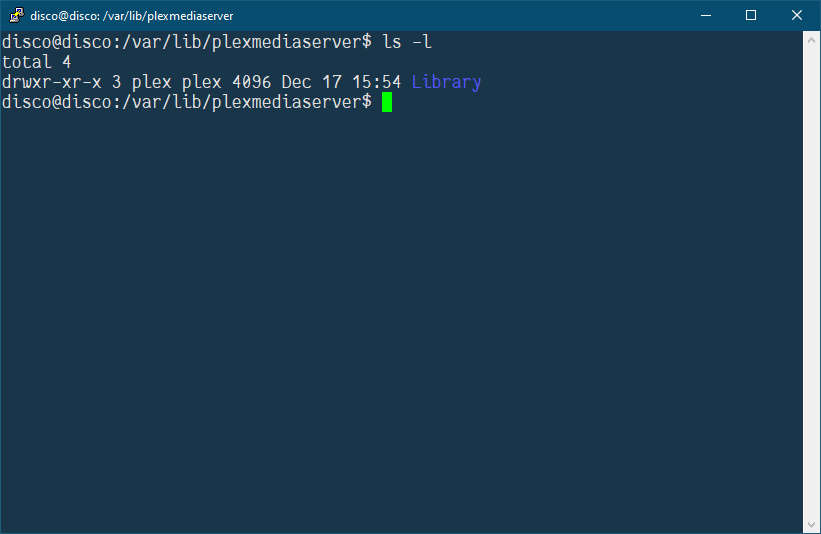
Assuming there were no errors, there’s just one more step. The files on unraid are owned by the user
nobody, but Plex on Ubuntu is expecting the files to be owned by theplexuser. Enter the following command to change ownership of the metadata files in Ubuntu:
sudo chown -R plex:plex /var/lib/plexmediaserver/ -
Verify the ownership was changed properly by entering
ls -l /var/lib/plexmediaserver/
and make sure the output looks something like this:
-
5. Reboot and Test
-
At this point, all of the hard work is done. Now you just need to reboot the Plex system to ensure the NFS shares mount and Plex starts automatically after the restart. Enter
sudo rebootin the terminal and your system will automatically restart. Once it has rebooted, open a browser and go to the Plex web interface,http://<ubuntu_ip>:32400/web. Plex may bug you to sign in, and once you’re signed in, you should see your Plex home screen with all of your media intact. -
Before you test playback, you’ll need to enable hardware transcoding in order to use the QuickSync goodness. Go to
Settings>Transcoder, and check theUse hardware acceleration when availablebox. It should take effect immediately, Now, test a file from one of your libraries, it should start playing with no issues.
6. Post-Install Updates
Now that Plex is working properly on your new server, you’ll want to update your other programs to point at the new server. Check your config for Tautulli, Sonarr, Radarr, etc., and make sure your router’s port forward is pointing to the new server as well. You can also remove your Plex container and metadata from unraid to free up the space.
Changelog:
16-Apr-2020 - Updated ISO links to Ubuntu 19.10 since 19.04 is no longer supported. The guide is otherwise unchanged.
09-May-2020 - Updated ISO links again to Ubuntu 20.04, and updated placeholders to clear up some confusion.
12-May-2020 - Added some additional tips to the instructions