This article is for people who have just installed Ubuntu on a new system and want to add Docker and Docker-Compose to your system, but you’re not sure on the exact steps. As of the time of writing this guide, I am using Ubuntu 20.04.1 LTS, and installed Docker version 19.03.13, and Docker-Compose version 1.27.4. If you are running an older version of Ubuntu, these instructions should work with no modifications. Newer Ubuntu releases should also work eventually, but there will be a delay between when Ubuntu releases a new version and when Docker updates their package archive to work with the updated version.
Prerequisites
This guide assumes you have already installed Ubuntu, either the server or desktop version will work. You should also download and install all available updates, running sudo apt update && sudo apt upgrade from the terminal, or using the Ubuntu Software application from the desktop. Install any available updates and reboot if necessary before starting this installation.
Step by step instructions
Every command listed below will need to be run in the terminal. Most of the commands are preceeded by the sudo command, which lets you run a specific command as the “Super User” root account. Virtually all commands in linux are case-sensitive, so your best bet is to copy and paste the commands directly. Or, if you are unable to copy and paste, please double-check the command before you run it.
SAFETY NOTE Running an unknown command as root can be dangerous, and you should only run commands from a trusted source. I added an explanation for each command that explains exactly what you are running and why it’s needed, but as with any information you find on the Internet, you should verify it independently before blindly following along. In the case of this guide, you can find instructions very similar to these directly at the Docker website here: Ubuntu | Docker Docs
Installing Docker
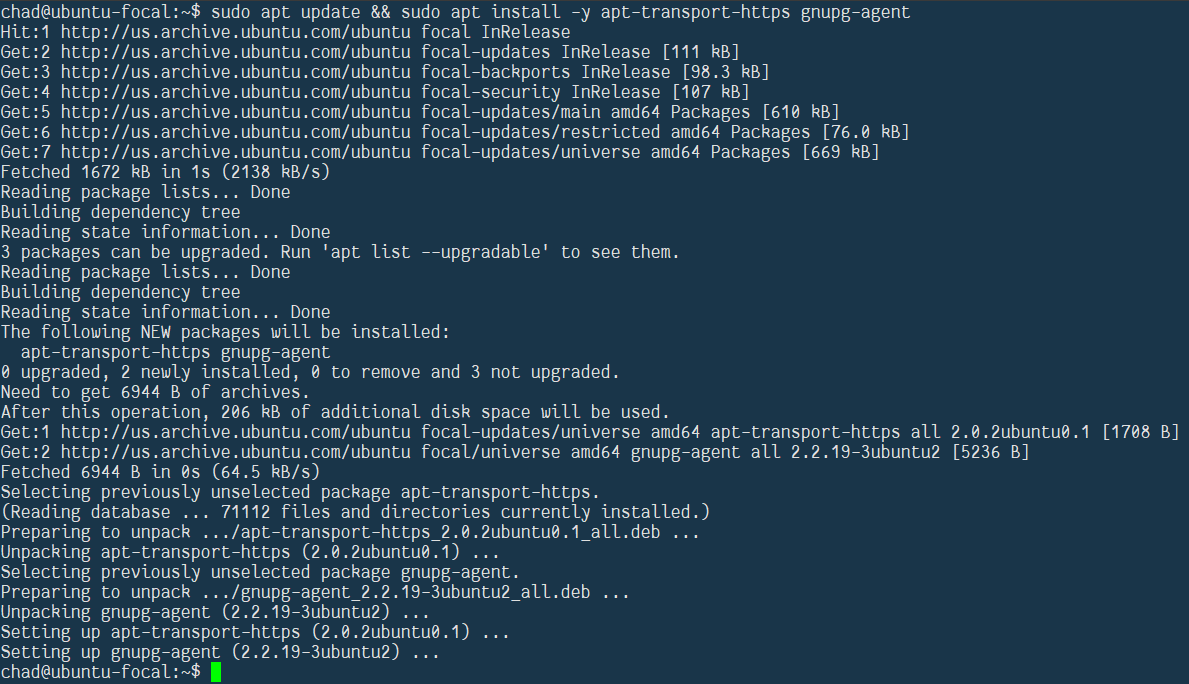
0. Install APT HTTPS transport and GNUPG agent
This first set of commands installs the packages necessary to access other packages over the HTTPS protocol (apt-transport-https), and to securely store digital keys, so the Docker installation packages can be downloaded securely and verified before they are installed.
sudo apt update && sudo apt install -y apt-transport-https gnupg-agent curl
You should get an output similar to the following:
1. Download the Docker PGP key and add it to your keystore
Now that you’ve added the GNUPG Agent, you need to add the key from Docker to your secure key store. This command downloads the public key from the Docker website and adds it to the GNUPG digital key store you just installed in the previous step. This key will be used in the next step to verify that the Docker package you downloaded is legitimate.
SAFETY NOTE This command runs curl, a program which can connect to remote servers to send and receive data. The curl program itself isn’t inherently bad, but the information it downloads could potentially harm your system. As with the commands above, please only download items from trusted sources.
curl -fsSL https://download.docker.com/linux/ubuntu/gpg | sudo apt-key add -
The proper output of this command is a simple OK
![]()
1.5 Verify the key installed properly
Run this command:
sudo apt-key fingerprint 0EBFCD88
to search the key store for the key you just added. Output should match the following:

Ensure that the second line of the output exactly matches this Docker key:
9DC8 5822 9FC7 DD38 854A E2D8 8D81 803C 0EBF CD88
2. Add the official Docker repository to your local sources list
The APT package tool will only download packages from a small list of sources. By default, this is just the servers run by Ubuntu. The command apt-add-repository adds entries to that list, specifically the Docker package server in this case.
SAFETY NOTE As with the above commands, make sure you are only adding trusted sources to your package list.
sudo add-apt-repository "deb [arch=amd64] https://download.docker.com/linux/ubuntu $(lsb_release -cs) stable"
Output should be similar to this:

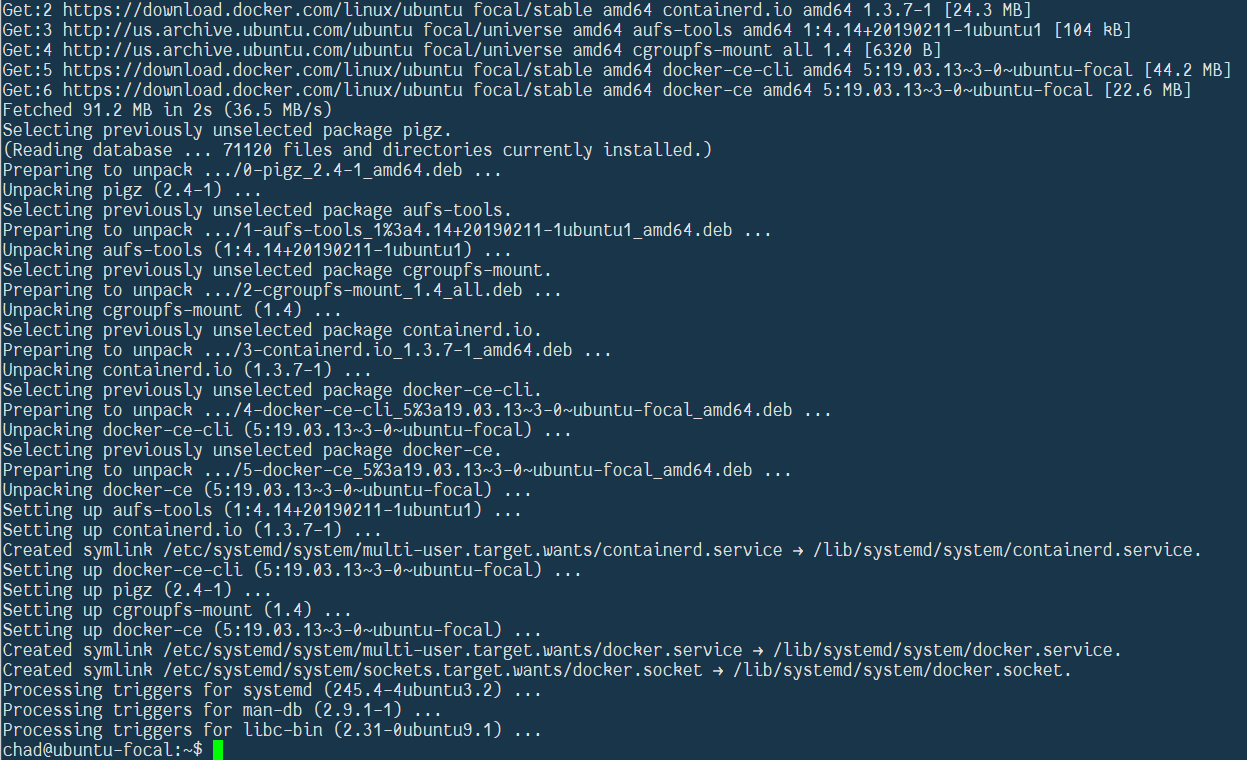
3. Update the list of available packages and install the Docker engine package
This command is doing essentially the same thing as the first step, but now that you’ve added the Docker package server to your sources list, apt is going to download the list of available packages from Docker as well as your standard Ubuntu packages. Once the list is updated, it installs the most current Docker package from the Docker servers.
sudo apt update && sudo apt install -y docker-ce
The output from this command will scroll on the screen for a while as the packages are installing, but the final result should look similar to this:
4. Verify that the Docker engine was installed properly and is running
Now that the package tool has installed Docker, you want to verify that it’s running properly. Run this command:
sudo systemctl status docker
It should show output like this. Verify that the third line down shows Active: active (running). If it shows inactive or failed or anything else, something didn’t work properly.

Once you’ve verified the Docker engine is running, press Q to get back to the terminal and continue on with the rest of the steps.
5. Add your current user account to the Docker group
By default, only the root user can work with Docker containers. From a security standpoint, this is fine, but it can be a bit inconvenient to preface all of your Docker commands with sudo. Adding your account to the Docker group allows you to run Docker commands as your own account. Run the following:
sudo usermod -aG docker $USER && exec su -l $USER
And enter your password to confirm. You won’t get any output from this command, it will just drop you back to the terminal.
![]()
6. Check your work
Now that Docker is installed and running, and you’ve been added to the Docker group, verify that you can connect to the Docker engine by running the following command:
docker --version
You should get an output similar to the following:
![]()
7. Final checks
At this point, the Docker engine is installed, and your user account can use it, so let’s run our first container to check. Enter the following:
docker run hello-world
It will download the hello-world container from the Docker Hub and you will see a message similar to this:
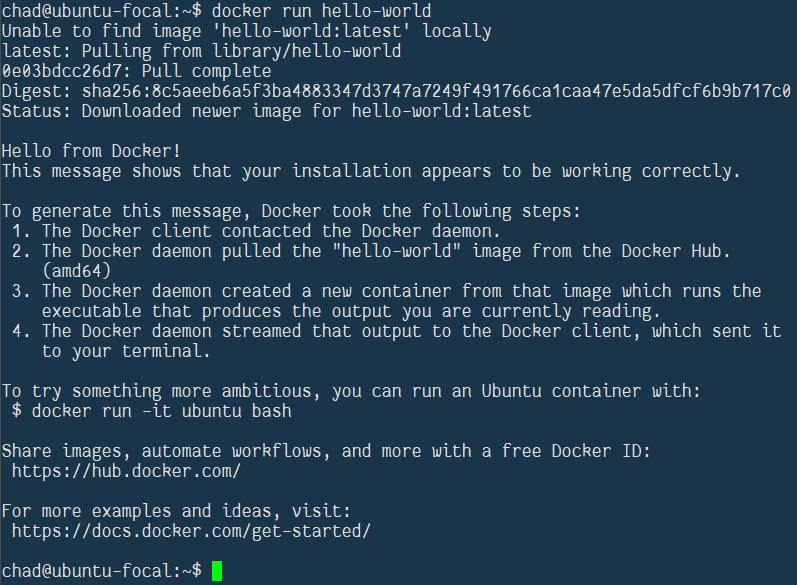
Congratulations, your Docker engine is working. If you’d like, you can remove the hello-world container now. Run docker system prune -a to clean out any stopped containers and remove any unused images, which in this case should just be the hello-world container.

Installing Docker-Compose
Now that you have Docker installed, you can add Docker-Compose to make it easier to manage multiple containers.
8. Download the Docker-Compose binary
We use curl again in this command to download the latest version of Docker-Compose from the Docker Github page. As of the time this guide is being written, the latest version is 1.27.4. Before you download, you may want to check the release page to see if a newer version has been added. Go to Release v5.0.2 · docker/compose · GitHub and check the version number. If necessary, modify the command to swap 1.27.4 to whatever version is listed there. The rest of the command will remain the same.
SAFETY NOTE As mentioned before, the curl command can download information from remote servers. In this case, we are downloading a binary that will run on your local system. If you aren’t copying and pasting the command below, triple-check the URL to ensure it is absolutely correct before you run the command.
sudo curl -L https://github.com/docker/compose/releases/download/1.27.4/docker-compose-`uname -s`-`uname -m` -o /usr/local/bin/docker-compose
The command will display a chart as it downloads and return you to the terminal once it’s complete, like so:
9. Make the Docker-Compose binary executable
The binary file downloaded above can’t be executed by default. You need to change the permissions to allow the system to execute it by running the following command:
sudo chmod +x /usr/local/bin/docker-compose
This command shows no output when it’s run successfully, like so:
![]()
If you get an error message, double-check your typing and try again.
10. Check your work
This last step just verifies that the docker-compose binary can execute properly. Run the following:
docker-compose --version
and you should get output similar to this:
![]()
Closing Notes
Now that you have Docker and Docker-Compose installed on your system, you’ll want to create a folder structure to hold your compose files and persistent container data. Here’s how I do it.
For a basic system with a single compose file, I create a folder structure like so:

The base /opt/docker folder contains the docker-compose.yml file and an optional .env file. The subfolder config stores separate subfolders for each container in the compose file (pihole and unifi in my case). Note that the containerd folder is created automatically when you install the Docker engine, and the error opening dir message in that screenshot isn’t an actual error, it’s just that my user account doesn’t have permissions to see what’s inside that folder.
If I want to run multiple compose files, I create a similar folder structure, but with separate folders for each compose file, like this:

In this case, the root /opt/docker folder contains no files, just a subfolder for each compose file. The subfolders contain their own docker-compose.yml file and .env files, and then each container has a folder inside the config folder of the parent compose folder.
I’ve seen a few different approaches to this, some people prefer to keep their config inside their home folder, others use a separate drive mounted under the /mnt folder. Really any of these approaches will work. Just find one that you like and stick with it.
That’s it, you’ve reached the end of the guide. If you have any questions, please feel free to reply below or contact me on Discord.
Revision History
04-Nov-2020 - Updated initial apt command to include the curl package which may not be installed by default in the Desktop version of Ubuntu. Also added step numbers to make navigation easier.