So you have a server with a ton of RAM and you want to use this RAM disk thingy that everyone keeps talking about. How do you do it? It’s super easy, barely an inconvenience. First, a quick overview, just what the heck is a RAM disk? A RAM disk is a portion of your system memory that is presented as a storage device just like a USB stick or a hard drive. You can read and write data to the disk as much as you want, and it won’t wear out like an SSD or a spinning drive. It is temporary in nature, so anything that you leave on the drive will disappear when you turn the computer off.
Now that you know what a RAM disk is, here’s how you can use it. The method varies slightly depending on what OS you’re using, but the end result will be the same. Find your OS below and follow the steps listed to configure your system. One quick note, the directions here will change the transcoding folder for live transcodes only. If you have optimized versions set up for your media, or clients sync media at something other than original quality, they will still be placed in the Plex library Cache\Transcode folder.
Choose your OS
Container in Unraid
Unraid has a built-in shared RAM disk accessible under the /dev/shm folder. This shared RAM disk defaults to half of the total system memory, which should usually be more than enough for a few Plex transcodes.
-
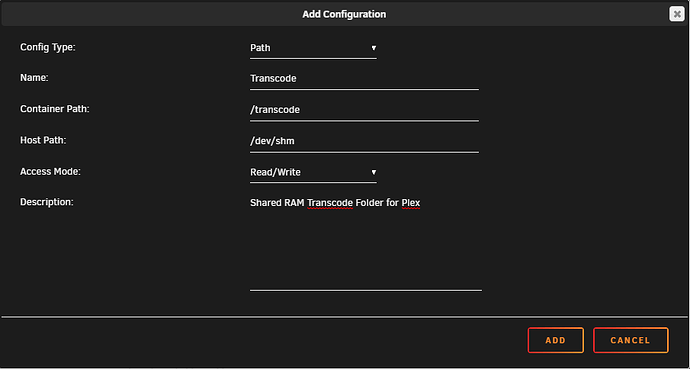
Edit the configuration of your Plex container and add another path. You want to map
/dev/shmon the host to/transcodein the container.
-
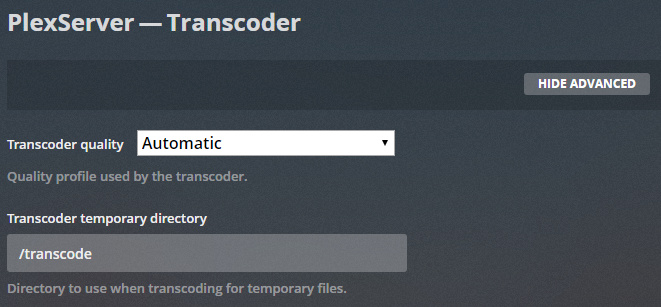
Once the Plex container has started, open the Plex Web UI. Go to
Settings→Transcoder. Click theShow Advancedbutton and set theTranscoder temporary directoryto/transcode. Save the changes.
Most modern Linux distros on bare metal
Nearly all modern Linux distributions have a built-in shared RAM disk accessible under the /dev/shm folder. If you’re not sure whether or not your distro has the built-in disk, just check to see if the /dev/shm folder exists. The built-in shared RAM disk defaults to half of the total system memory. If you’re using one of the distros that has this built-in, and you’re running Plex directly in the OS (ie not in a container), then changing the transcode folder is one simple step.
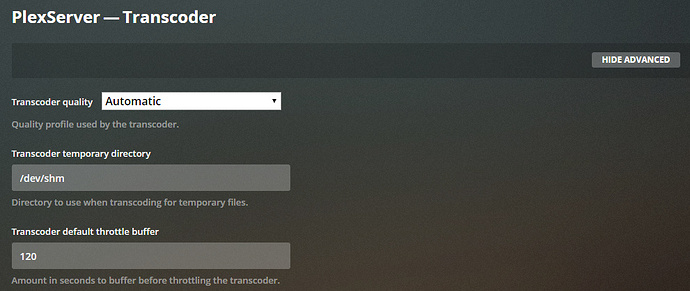
- Open the Plex Web UI. Go to
Settings→Transcoder. Click theShow Advancedbutton if necessary, and change theTranscode temporary directoryto/dev/shm. Save the settings.
Container on a bare metal linux distro
Just like in the unraid instructions, all you need to do is add a volume to map the /dev/shm folder
on the host to the /transcode folder in the container. If you’re using Docker for your containers and you followed the instructions for the official Plex container or the linuxservers container, you should already have a folder mapped to /transcode.
- Docker
Recreate your container, adding the following to the command-v /dev/shm:/transcode - Docker-compose
Add the following line to the volumes section of your Plex container definition- /dev/shm:/transcode
Virtualized linux distro
The steps to change the transcode folder are identical to changing it on a bare metal distro, but if you’re virtualizing your OS, I would recommend reserving enough RAM to cover the RAM disk plus the OS. In this situation, you may also want to adjust the size of the RAM disk so it doesn’t default to half of the available RAM. See the instructions below for this.
Windows
Windows doesn’t have a built-in RAM disk, so you’ll need to install a program to create it for you. There are several options to create RAM disks, some of them come with more limitations than others. I’m going to use SoftPerfect RAM Disk v3.4.8 for my walk through, but if you prefer another program it should work just as well, as long as will automatically mount the disk and assign it a drive letter on boot. You can download SoftPerfect from MajorGeeks here: Download SoftPerfect RAM Disk - MajorGeeks
Please note that this program has been discontinued by the developer, but I have been using it for several years with no issues.
- Install SoftPerfect RAM Disk and open the program. Click the Plus icon to add a new RAM disk.
- Set the size to how much RAM you want to use for the disk. I’m using 2048 in this example because this computer doesn’t have much RAM, but you should be able to use 4096MB (4GB) if you have 16GB, and 8192MB (8GB) if you have 32GB.
- Change the drive letter to an available letter. I picked
R:for RAM disk, but you can pick whatever floats your boat. - Finally, set the filesystem to
NTFS - Leave the other options at their defaults. Click OK to create the RAM disk.
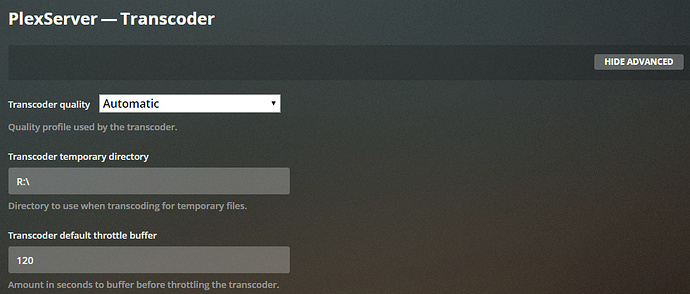
- Once the RAM disk is created, you just need to configure Plex to use the disk for transcoding. Open the Plex Web UI and go to
Settings→Transcoder. Click on theShow Advancedbutton, and change theTranscoder temporary directoryto the drive letter you entered above. Save your changes.
Advanced Topics
Changing the size of your shared RAM disk in Linux
As I mentioned above, the shared RAM disk defaults to half of the available system RAM. If you would like to change it to be larger (or smaller) by default, you will need to edit the /etc/fstab folder to adjust the size. Open /etc/fstab in your editor of choice and check for an existing line that mounts /dev/shm. If one doesn’t exist, create one with the following syntax:
tmpfs /dev/shm tmpfs defaults,size=1g 0 0
![]()
Once you’ve made the change, you can remount the folder mount -o remount /dev/shm or reboot.
How much RAM do I need?
Short answer: At least 16GB total system RAM, with 8GB allocated to RAM disk.
Long-winded explanation:
When Plex needs to transcode media for any reason (resolution or bitrate change, container change, audio conversion, subtitles, etc.), it uses the transcode folder. It pulls the streams out of the original container in 8 second chunks, transcodes them if necessary, and then dumps them in the transcode folder. Depending on the bitrate, the video chunks can range anywhere from about 7 megabytes per minute for a basic SD video to 200+ megabytes for a high bitrate 1080p file. And if you have 4K media, you could be looking at 400-500MB per minute.
Plex keeps these chunks around even after they have been watched, until the playback stops (pausing is not stopping, and a paused video will keep the chunks around indefinitely) or until the transcode folder drops to less than 100MB of free space. Plex has some intelligence baked in that should remove the oldest watched chunks once the free space drops to 100MB, but if that can’t keep up, you can get the dreaded “Playback Error Conversion failed” error when you try to start playback.


