Example NSFW 2.0 Build (Virtualization)
Specifications
- 16C/32T @ 2.6Ghz
- 64GB RAM
- 24TB Storage (Raw), 29TB (Compressed ZFS)
- 500GB SSD OS
Prices
| Type | Part (link) | Expected Cost |
|---|---|---|
| CPU | 2 x E5-2650-v2 | $130 |
| CPU cooler | 2 x EVGA CLC CL11 | $108 |
| CPU Bracket | 2 x Intel 2011 Narrow Standard Retention Kit | $16 |
| Motherboard | X9DRH-7F | $150 |
| RAM | 8 x Samsung PC3-10600R 8GB | $75 |
| Power Supply | EVGA Supernova 850 G2 | $107 |
| Case | Rosewill 4U L4500 | $100 |
| Fans (120mm) | 3 x ARCTIC P12 PWM | $28 |
| Fans (80mm) | 2 x ARCTIC P8 PWM | $25 |
| SAS Cables | 2 x SF8087 → SATA | $16 |
| Hard Drives | 4 x 8TB WD Red (shucked) | $520 |
| SSDs | 2 x Crucial MX500 SSDs | $132 |
| Subtotal | Excluding already owned Hard disks + SSDs | $740 |
| Total | $1408 |
Description
This build was put together to replace my Supermicro Mini Server SYS-5029S-TN2 (i5-6400 + 32GB ram + 4 x 8TB WD Red shucked drives) with something much more beefy and much easier to upgrade/expand.
I wanted something that had a ton of cores and a modest amount of ram, but would be very quiet and consume a relatively low amount of power.
I run Debian 10, ZFSonLinux RAIDZ1, Docker containers (around 15 or so), Windows VM, Mac OSX VM, VNC (GUI for Debian) and use it as a spare workstation via ssh. My current server is around 80% memory usage (mainly because of write cache for ZFS), and uses about 20-30% CPU all the time. Not a bad little system, but the DDR4 laptop ram was outrageously expensive, and tops out at 32GB, hence the reason for the upgrade. ![]()
Build
Did a ton of research on boards, and settled on the X9DRH-7F. It was the closest thing I could find to the Anniversary 1.0 build, but made by Supermicro and relatively easy to find for a decent price. I started by taking Riggi’s list of boards and just deleting each one that didn’t fit my list of wants/needs. Everyone was pushing this board, which makes total sense, so after some research I was able to confirm that it’s really the best board for this build. I looked at other boards that had more PCIe x 16 slots, but often were either too expensive, or did not contain a built-in SAS controller, hence another reason to choose this board.
RAM was hard to find for a decent price, so whatever you use, be sure to check that it’s compatible by using the “Tested Memory List” link on this page: https://www.supermicro.com/products/motherboard/Xeon/C600/X9DRH-7F.cfm
The suggestion was to buy 16GB memory modules, but every kit or separately priced sticks were just too expensive, so I opted for a kit of 64GB (8 x 8GB) since it was much cheaper and allows me to easily upgrade down the road.
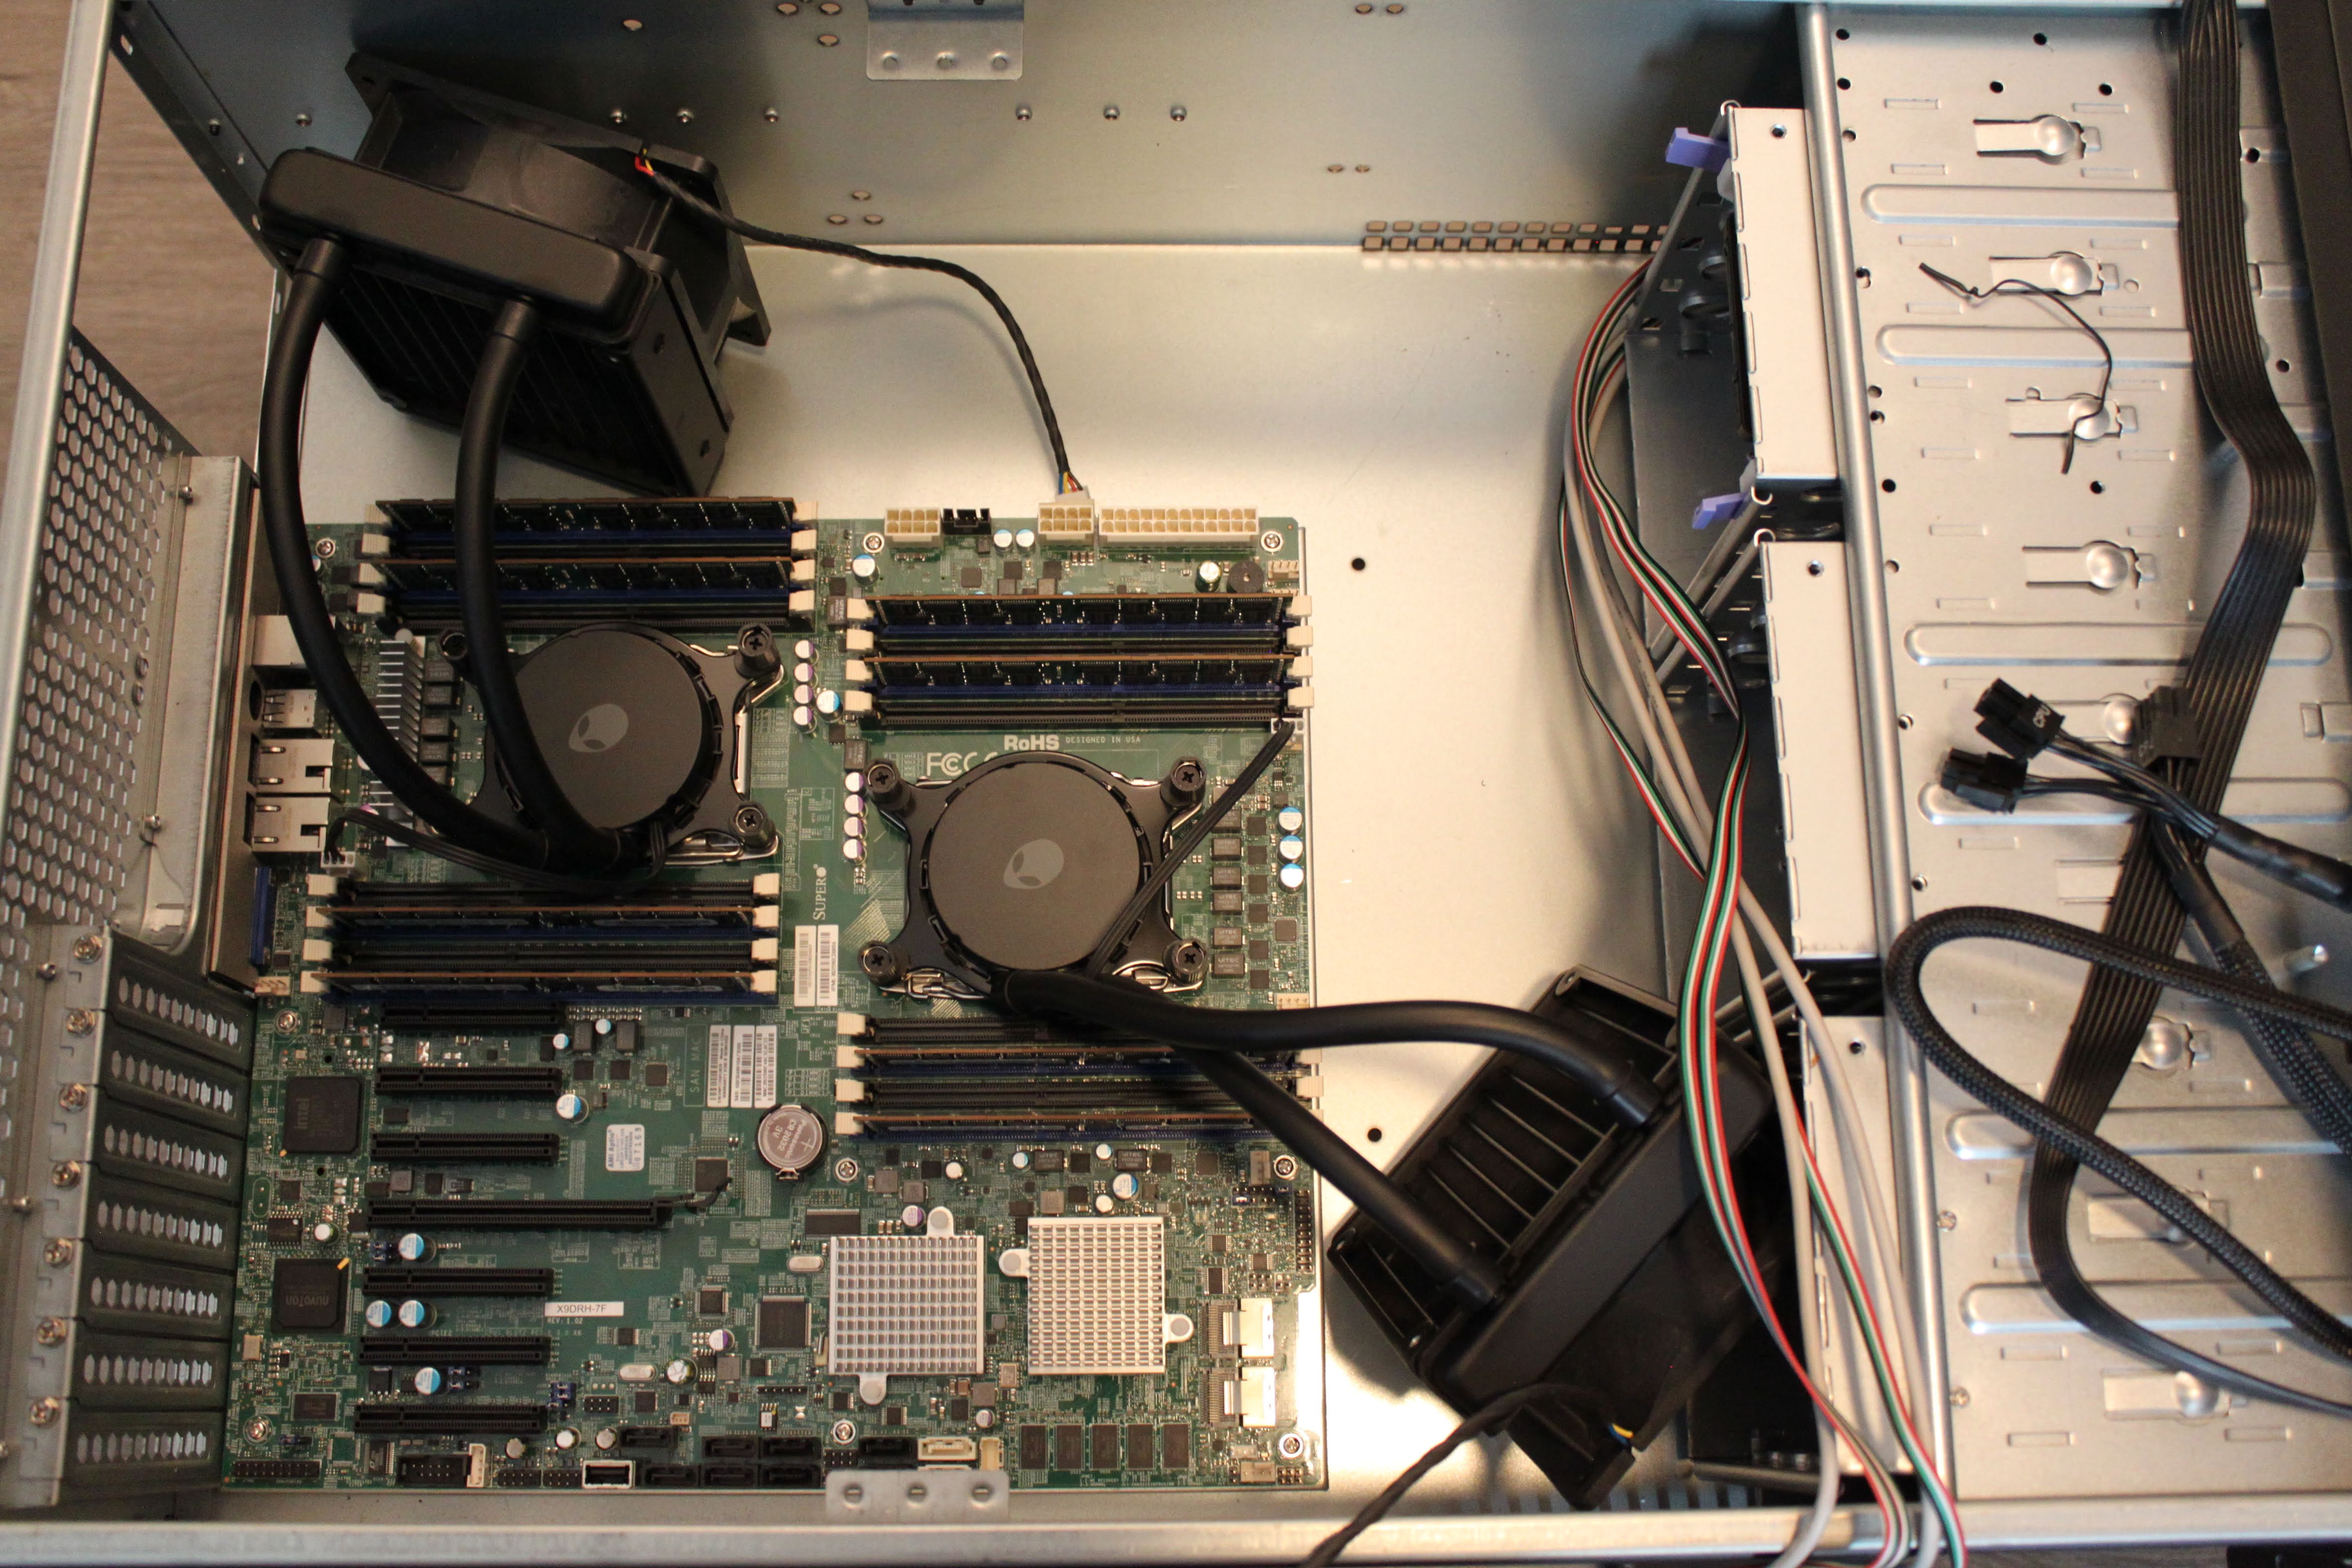
At first I went with the Dell Area 51 R2 liquid-cooled CPU cooler since it was cheaper, but it ended up arriving damaged, plus the hoses were far too short to reach the fan wall, so I ended up returning them. I purchased the EVGA CLC CL11 as replacements, which fit perfectly and work quite well. Even in a hot closet, it never gets above 40C. These were the ones that JDM used in his liquid cooling installation video, and were the cheapest of the bunch.
This system has been running for almost a week now and has been great! The Supermicro IPMI interface is super slick and a super nice feature to have.
The old server consumed about 48-50W at idle, which was crazy energy efficient, but not all that useful for me. This new build with is more than 2-8 times more powerful (depending on the spec.), but only consumes around 100-130W at idle, which is still not bad!
Fair warning, this LSI card was an absolute pain to flash to IT mode, so be sure to follow the article I wrote about it here.
This system is a bit louder than the old one, but that’s going to happen since it has 2 more 120mm + 2 80mm fans running. Other than that, it’s been great so far!
Physical Build
Final product
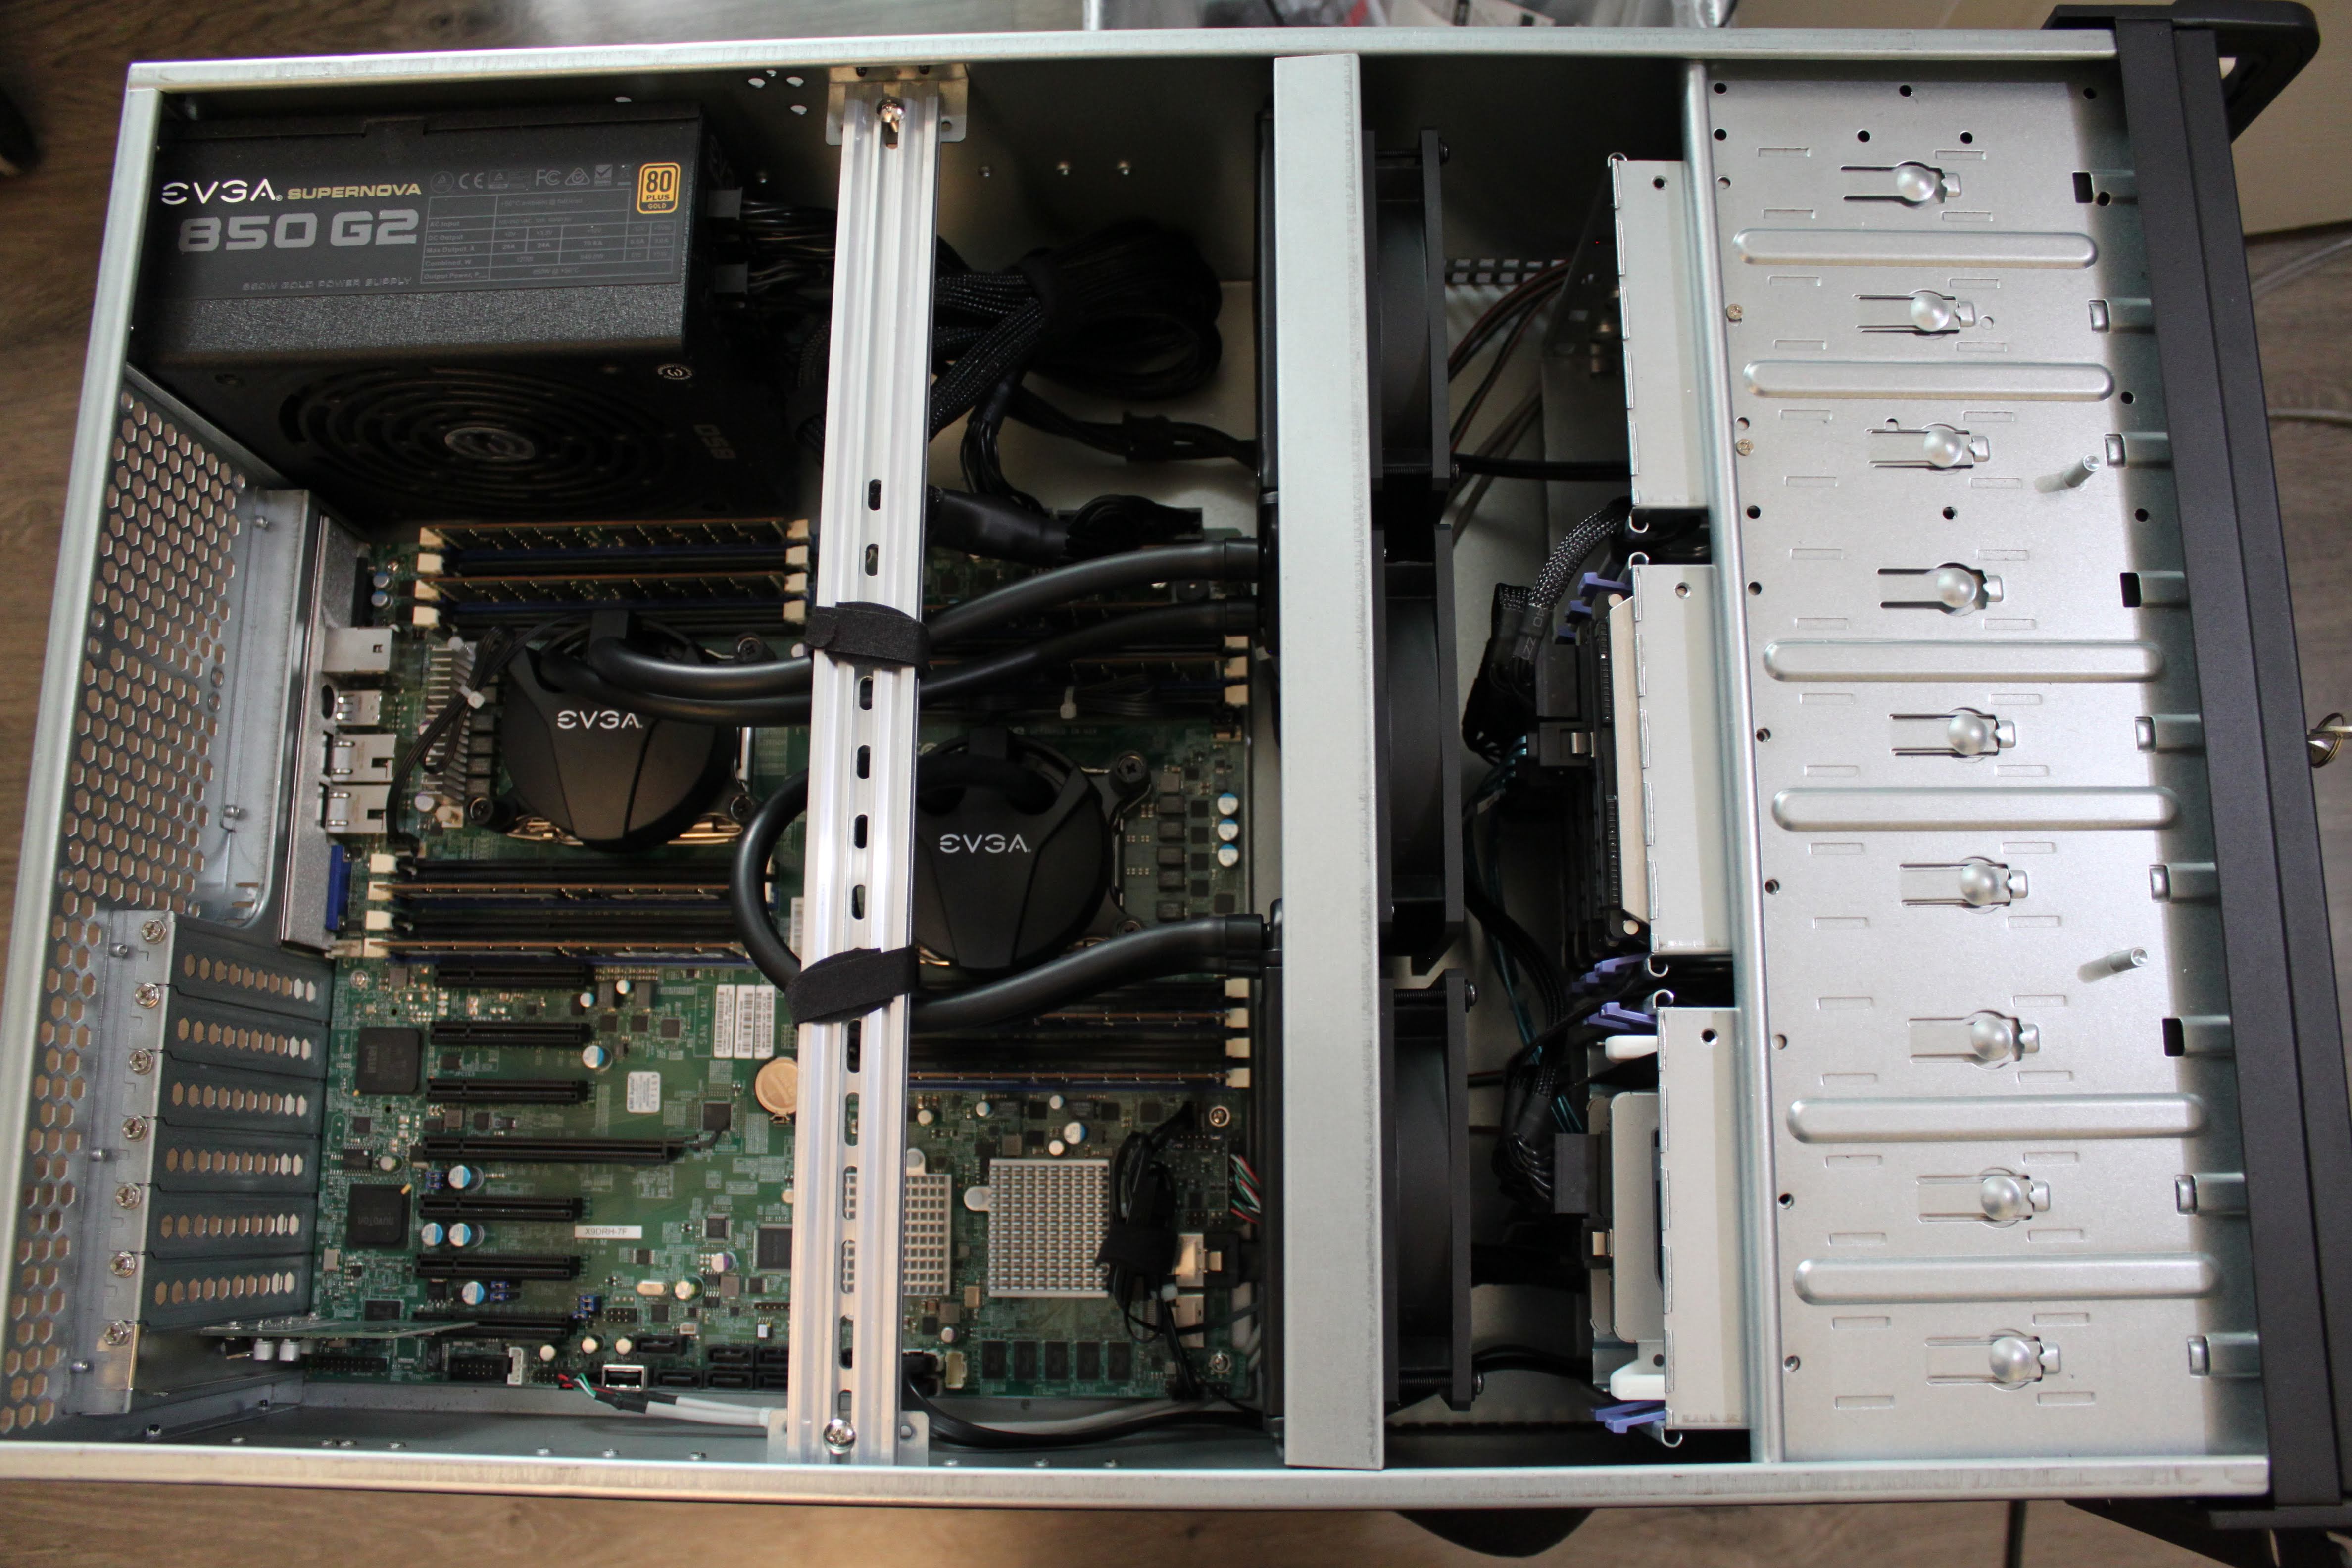
Installed the 80mm fans later, but this photo was not taken with a potato
First Boot out of case
As suggested, I installed the CPUs + Liquid Coolers, RAM into the motherboard outside of the case for initial power-up. The Corsair PSU claimed to have Dual EPS, but only had one. Ended up doing the initial boot with only a single EPS connected until I found the EVGA PSU in another machine and swapped them out.
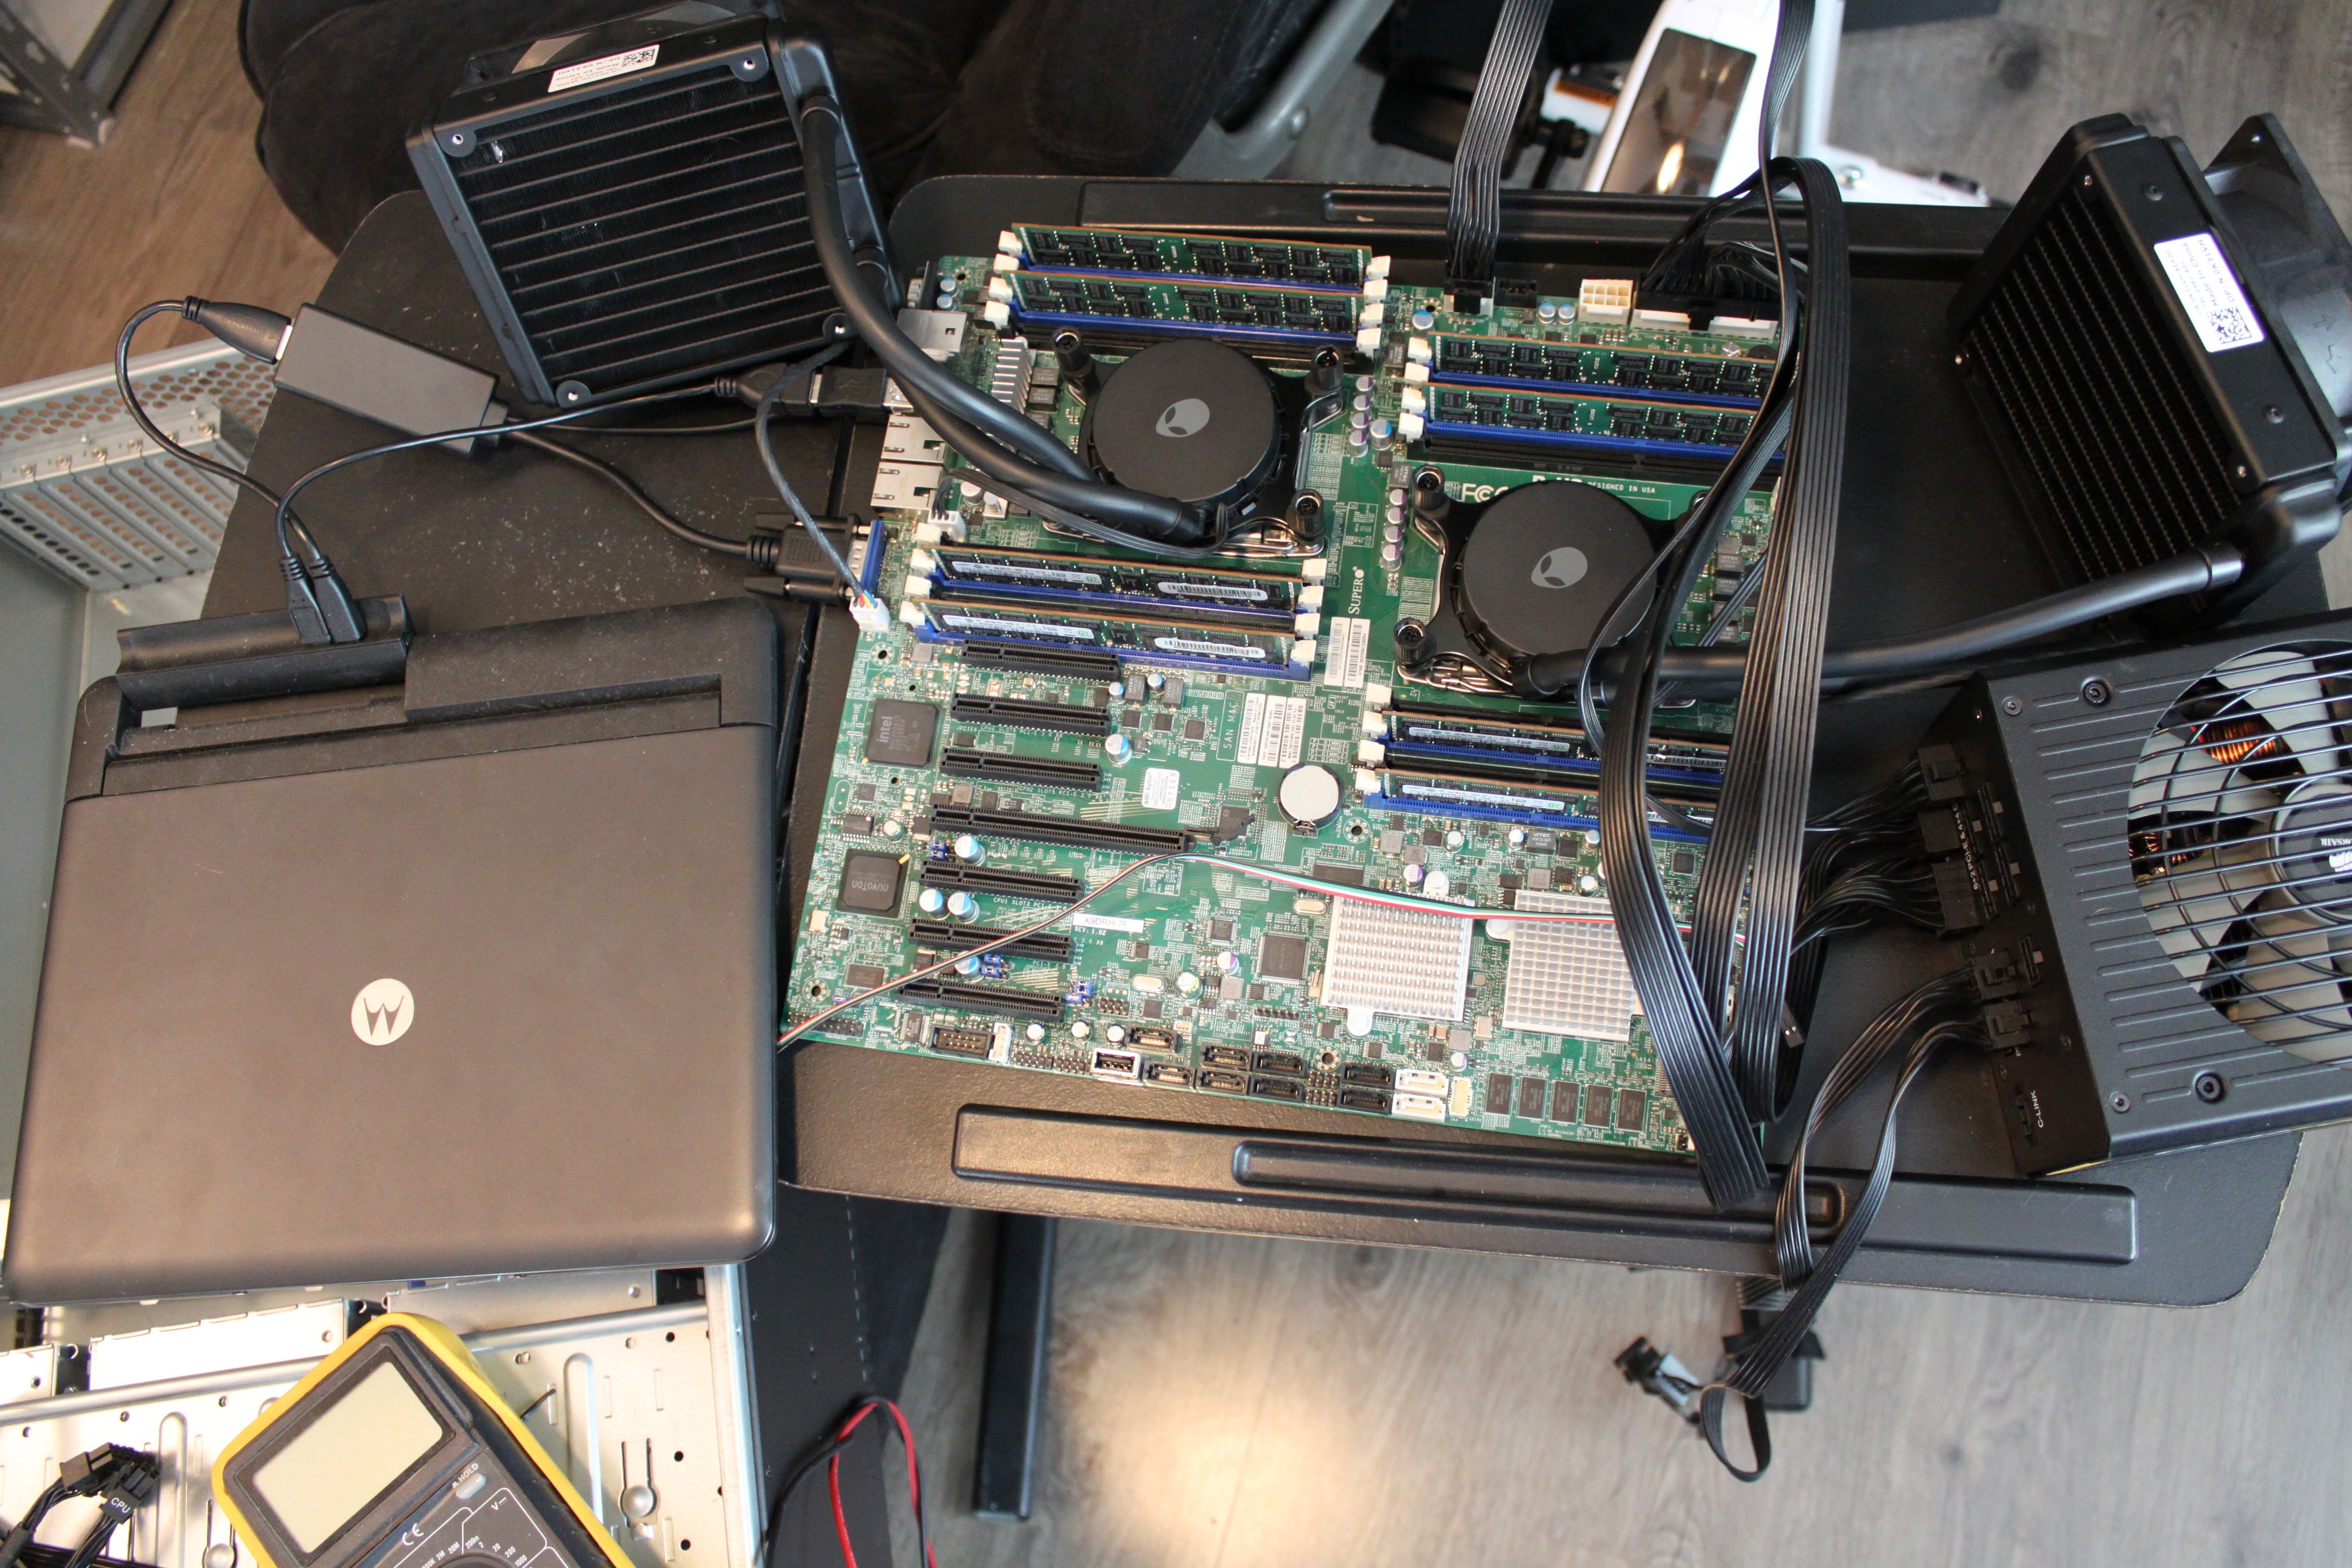
Hooked up a Motorola Lap-dock (my poor-man’s crash cart) and double checked the pinout from the Rosewill power button (Separate power switch + LEDs were not scavenged just yet, so I just used the case’s switch since it was close.)
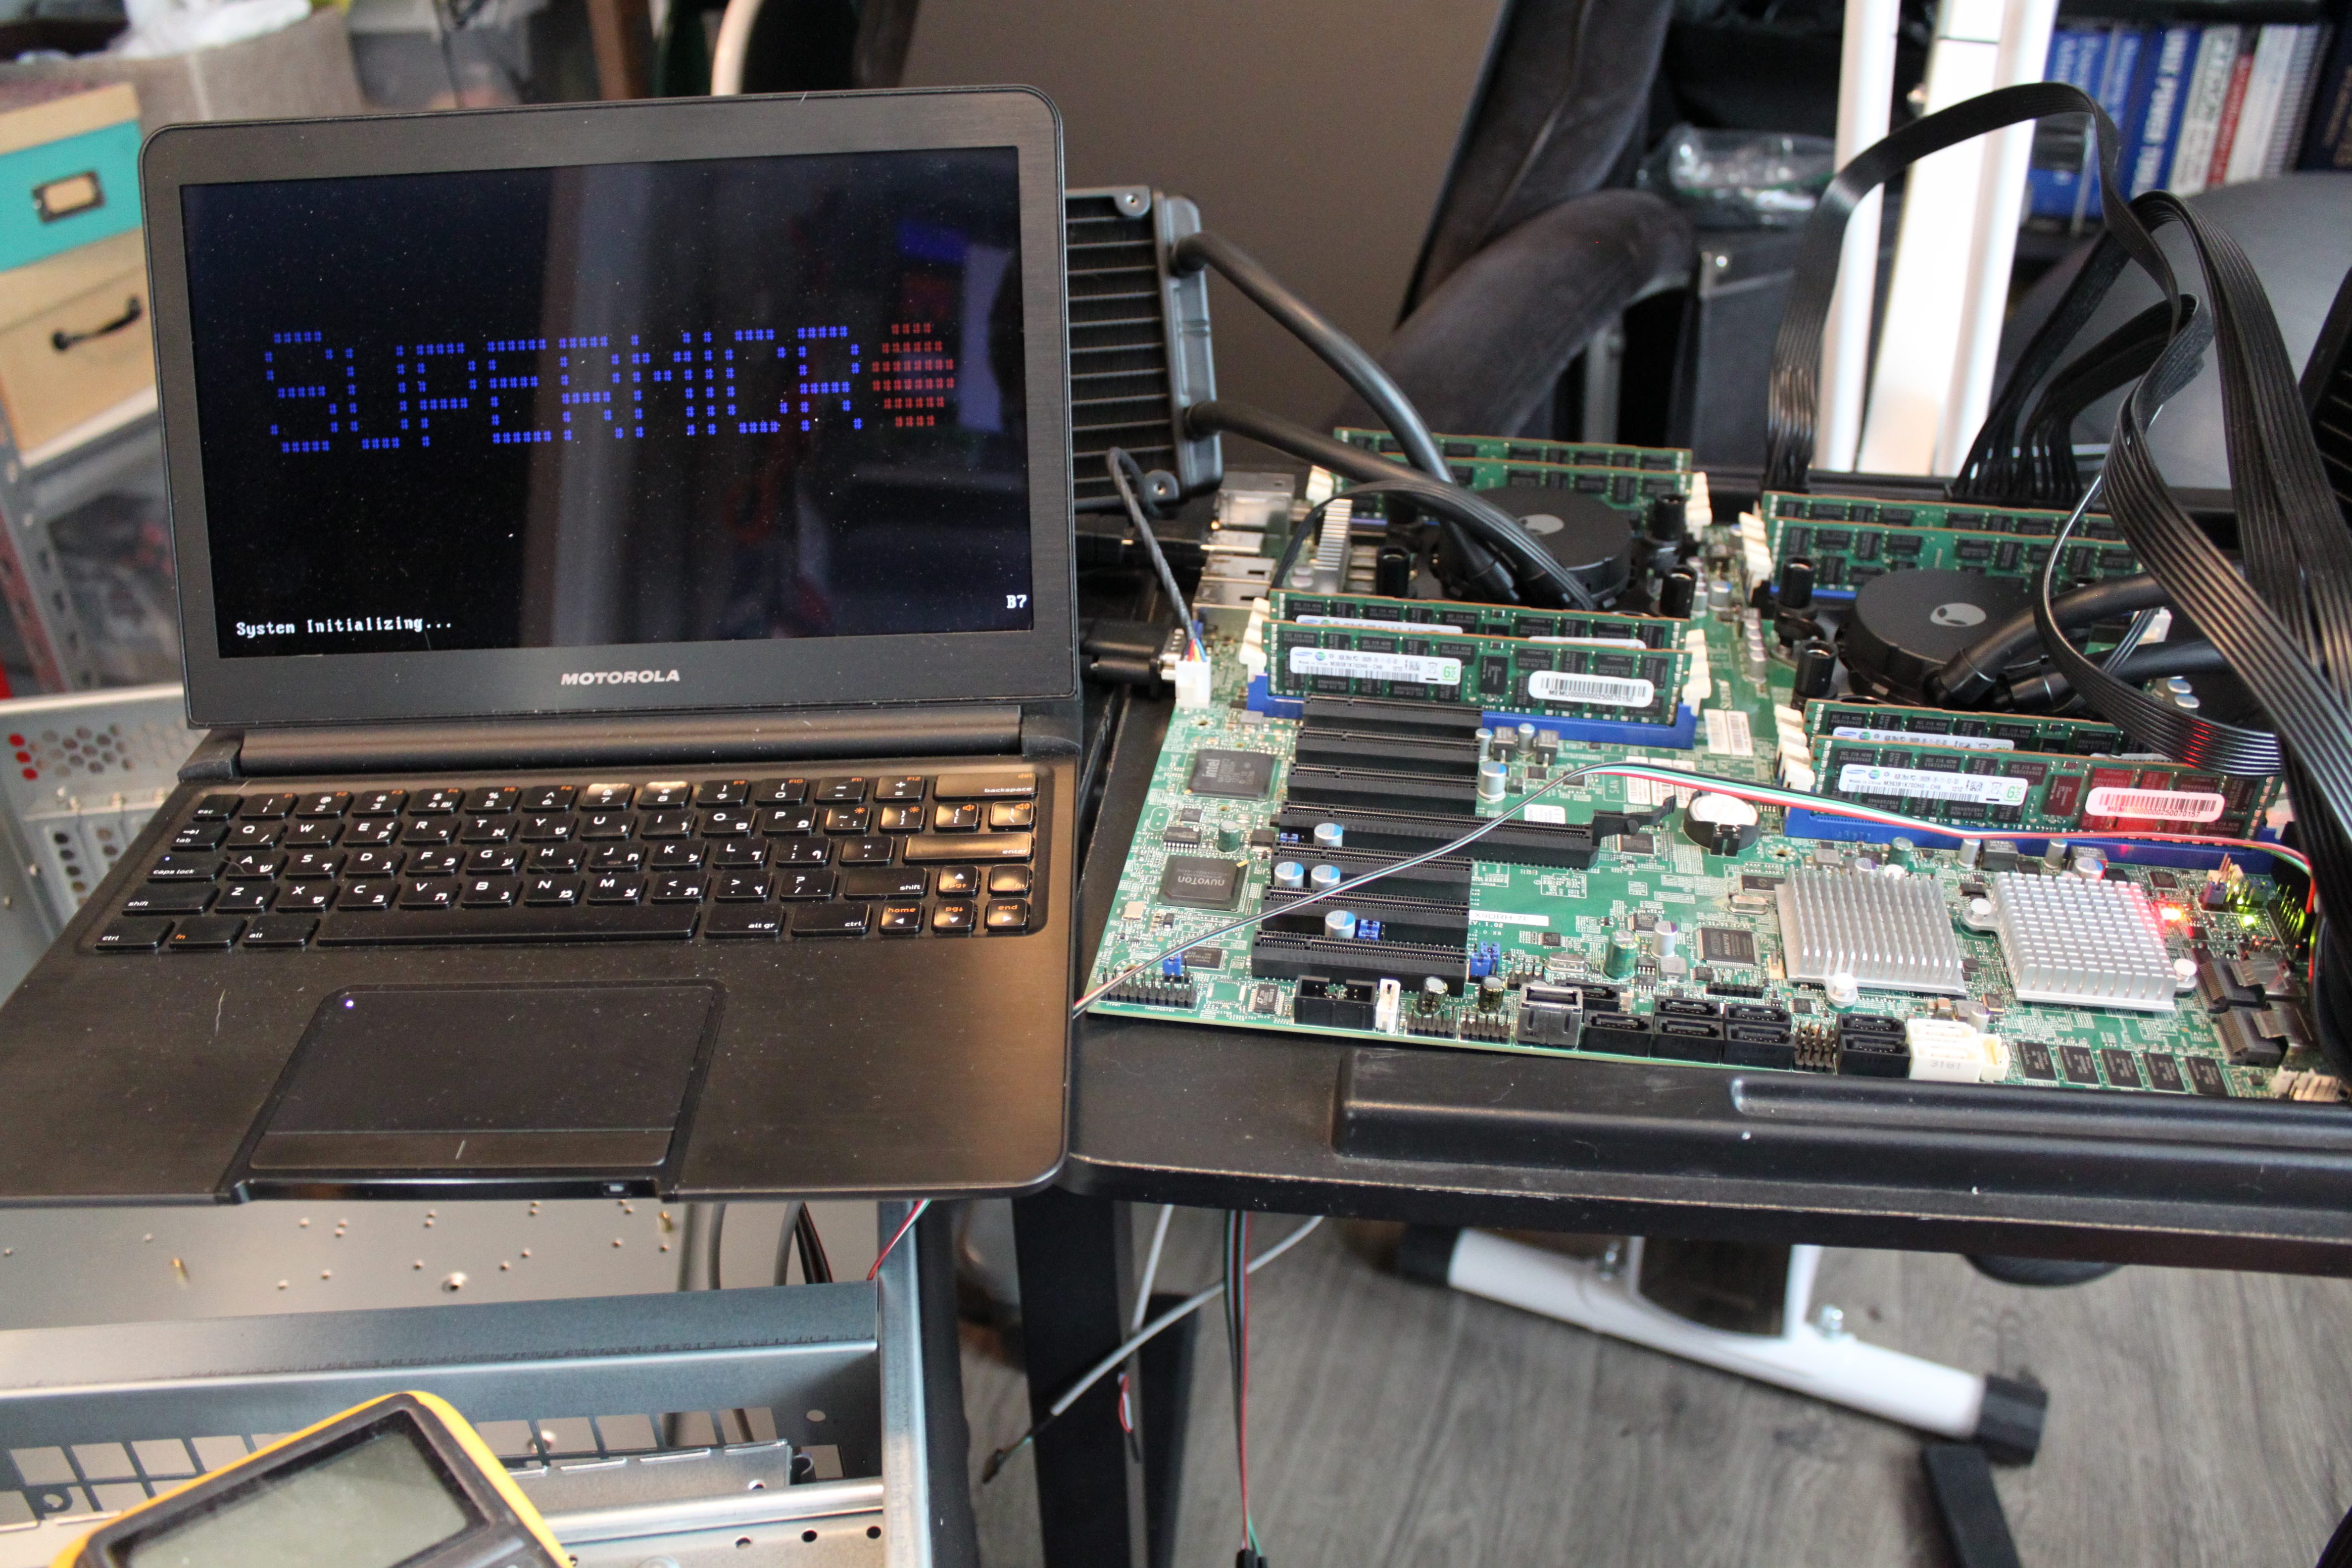
Woo hoo! Got it to POST after a bit of troubleshooting. Initially tried to use a separate EPS cable I had lying around, but it didn’t work, so I just used one EPS to get it booted.
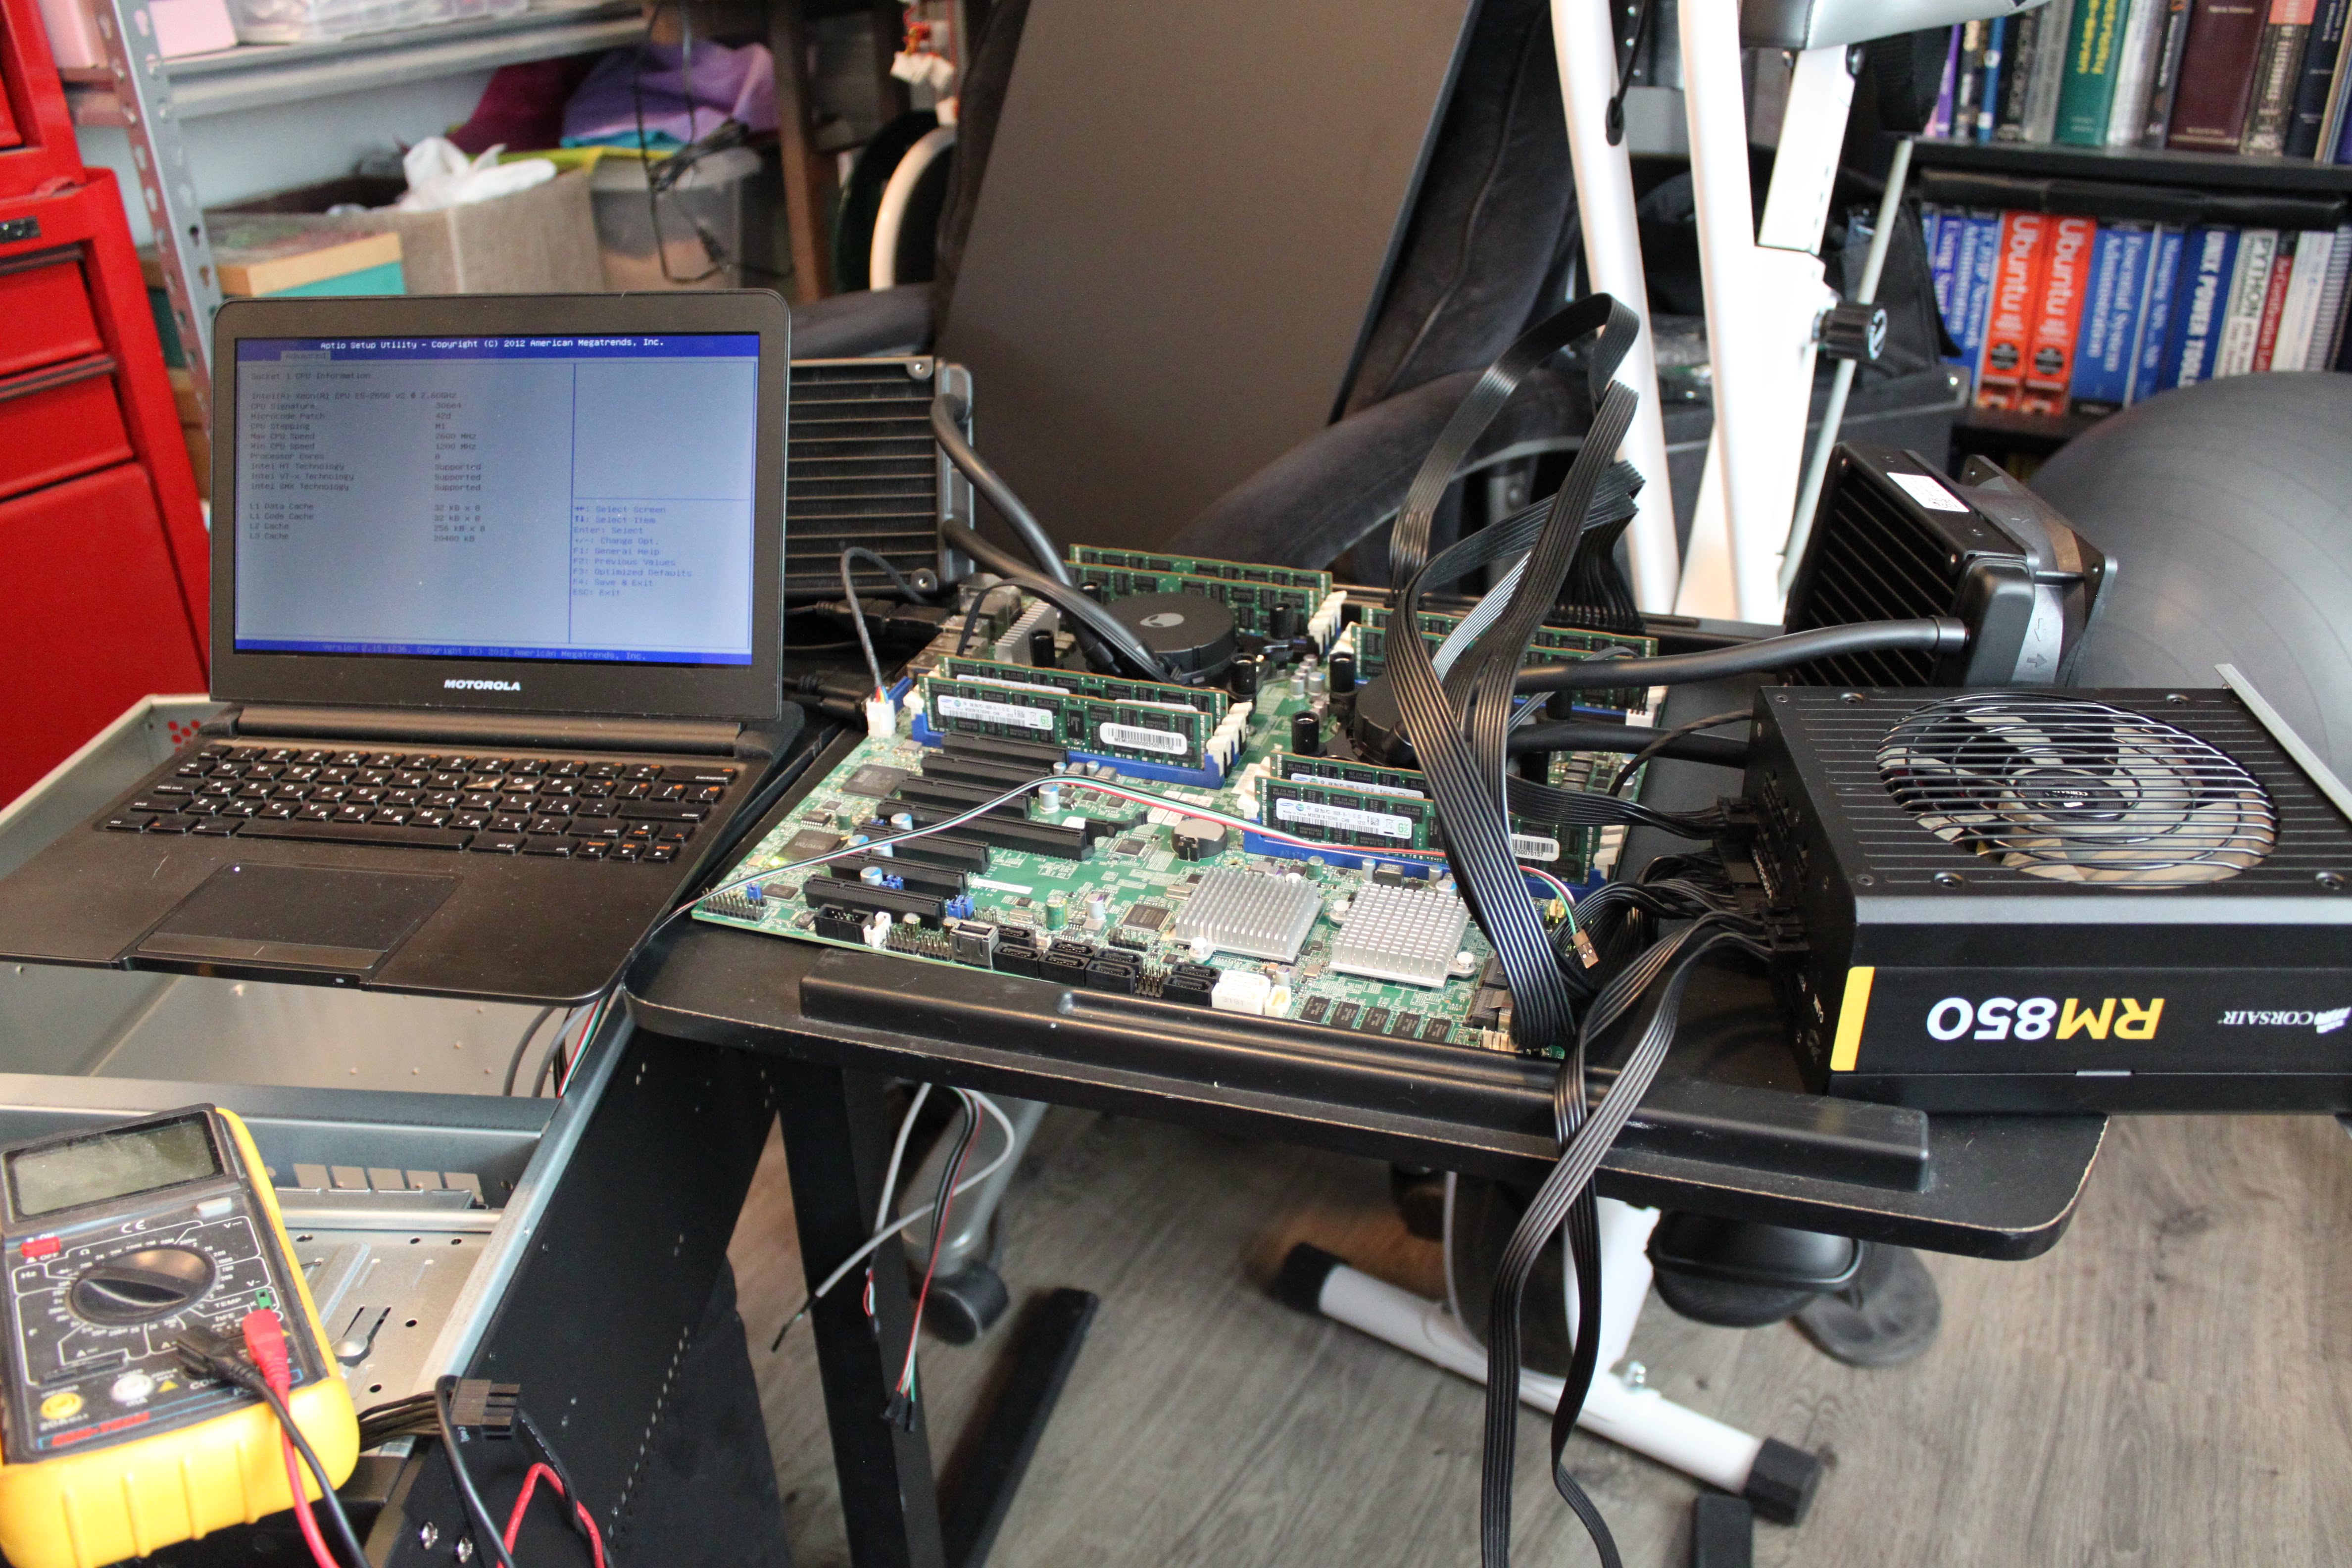
Got into the BIOS and started setting up some initial settings and verified that it detected both CPUs and the 64GB of installed memory. Now that it booted, off to the case!
Install into case
Thanks to OriginalTexter’s pictures/standoff locations, installation was a breeze. See those locations here. Measured everything just to be sure, installed the IO shield and put the motherboard in.
After all the screws were tightened down, started to get the drives installed and ready to go.
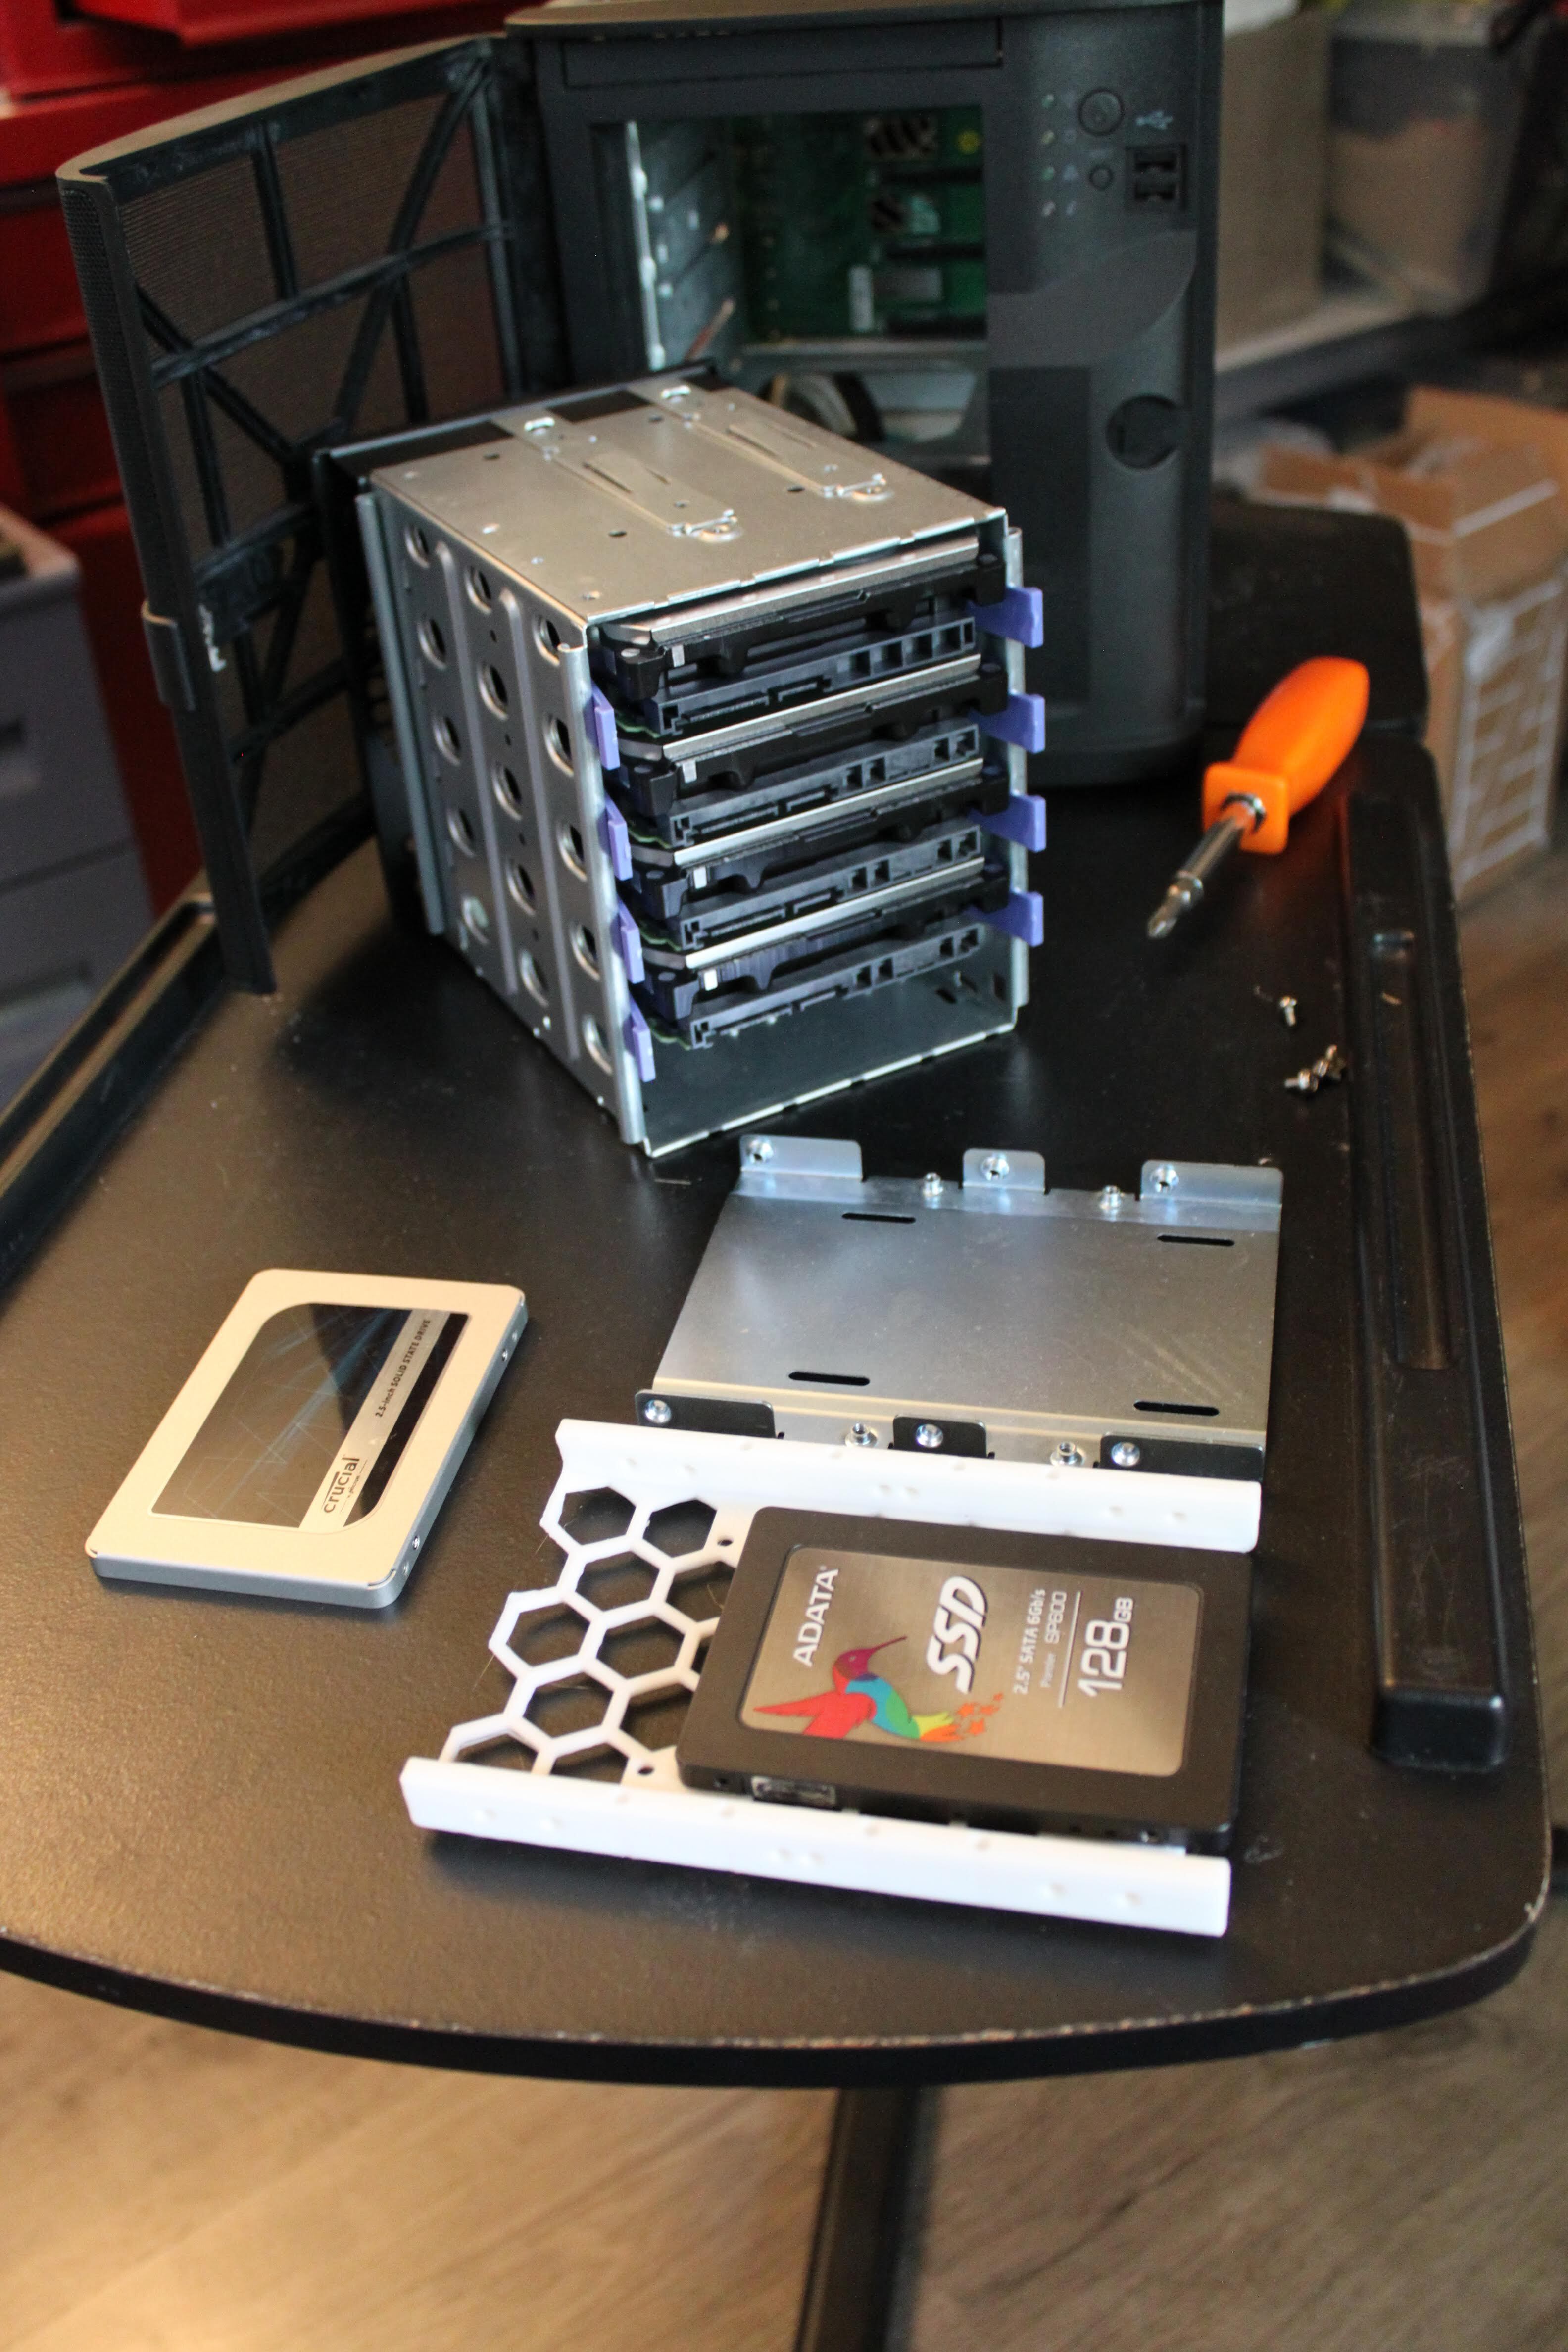
Installed 4 x 8TB WD Red (shucked drives from the previous server) into the drive cage. I only had one 3.5" to 2.5" tray adapter, so I printed another tray on my 3D Printer (Monoprice Maker Select). After checking fitment against another SSD, got them both installed into the drive cage.

Put both boot SSDs into the drive cage on the power button side of the case, and the WD Reds in the middle so that the center fan could could them on it’s own.
Cable Management
It turns out that the EVGA Liquid coolers were a bit too close to the RAM tabs on the fan wall, so I had to drill another set of holes to move the fan wall back a bit. Unfortunately this made installing the Hard drive + SSD SATA power connectors a bit challenging. To prevent the fans from rubbing, I had to use some cable ties/velcro ties to keep the SATA power and data cables tied down.
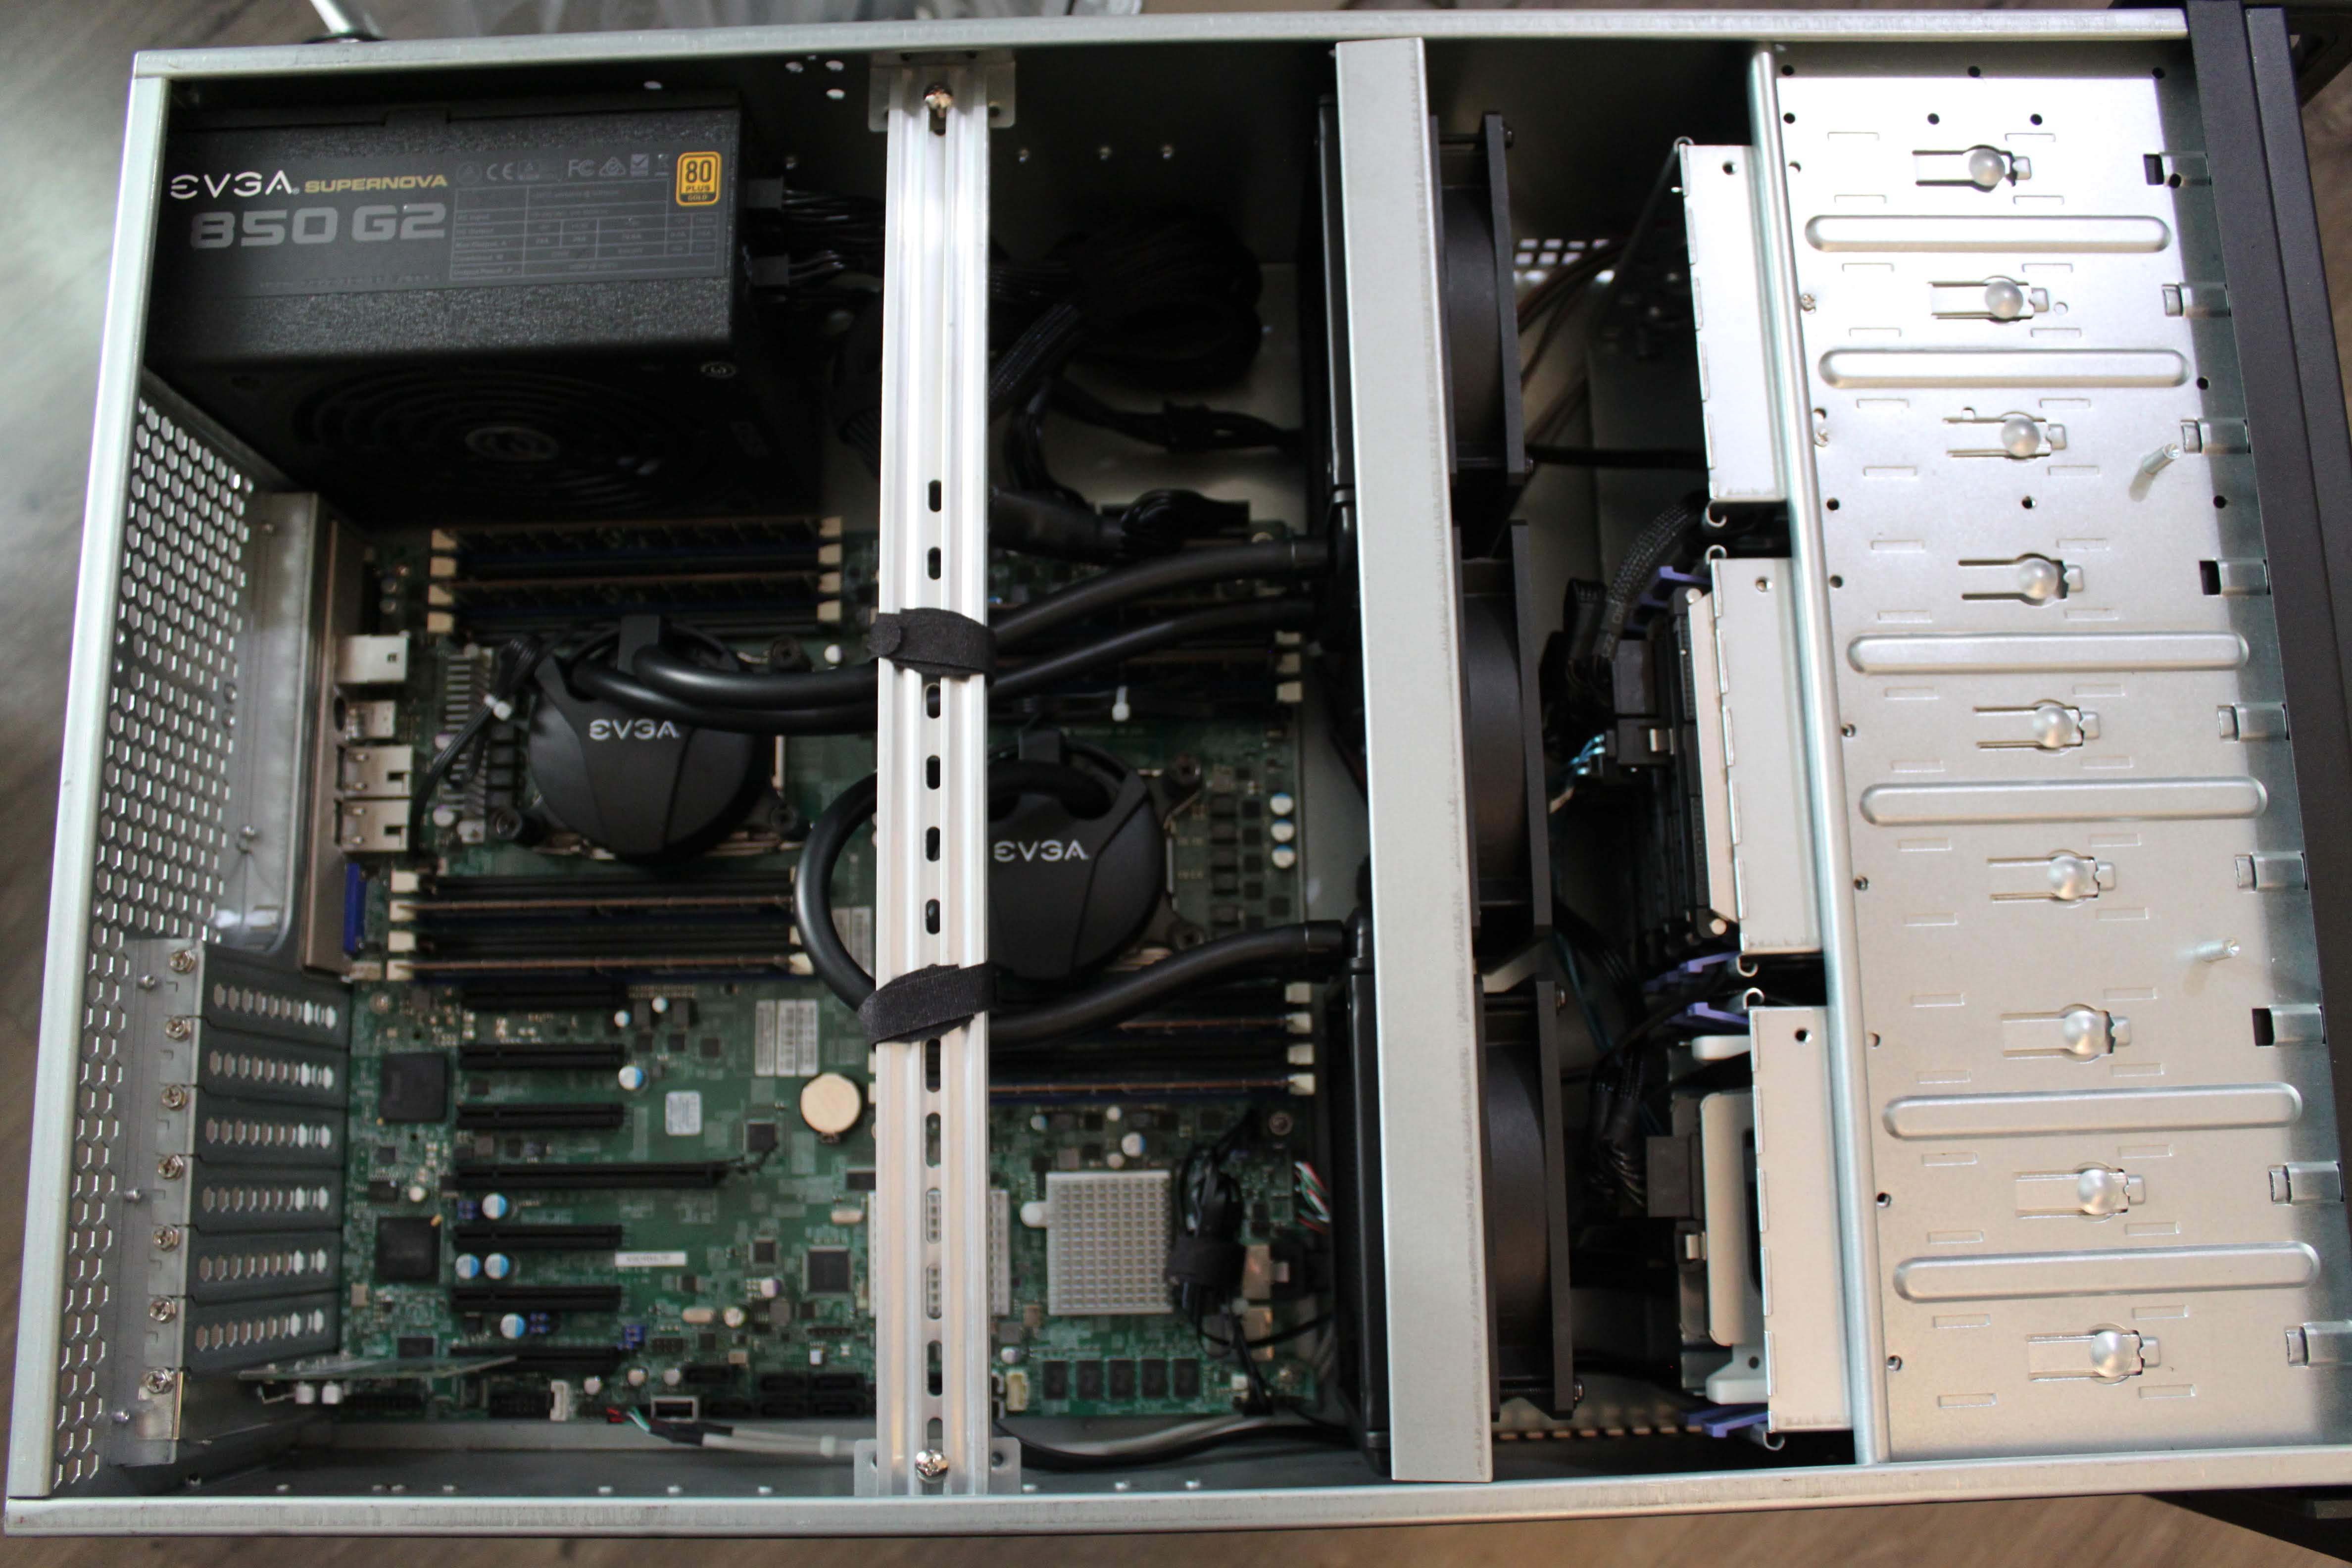
The radiators almost fit, but when I went to install the wall it would push the RAM tabs just enough to pop out the RAM. To prevent this, I drilled another set of holes to move it back a bit more. I drilled holes closer to the drive cages at the following dimensions: 15" back from the rear of the case, 2 1/8" and 5 1/8" from the bottom of the case on both sides. That moved the fans just far enough away to get the radiators to fit correctly.
The cables are fairly close to the fan blades, to I bent the cables back some to prevent them from rubbing on the blades. I cable tied down all the cables to prevent them from moving after installation. I also made sure to let the cable rest how it wanted, as in not trying to force the cable.
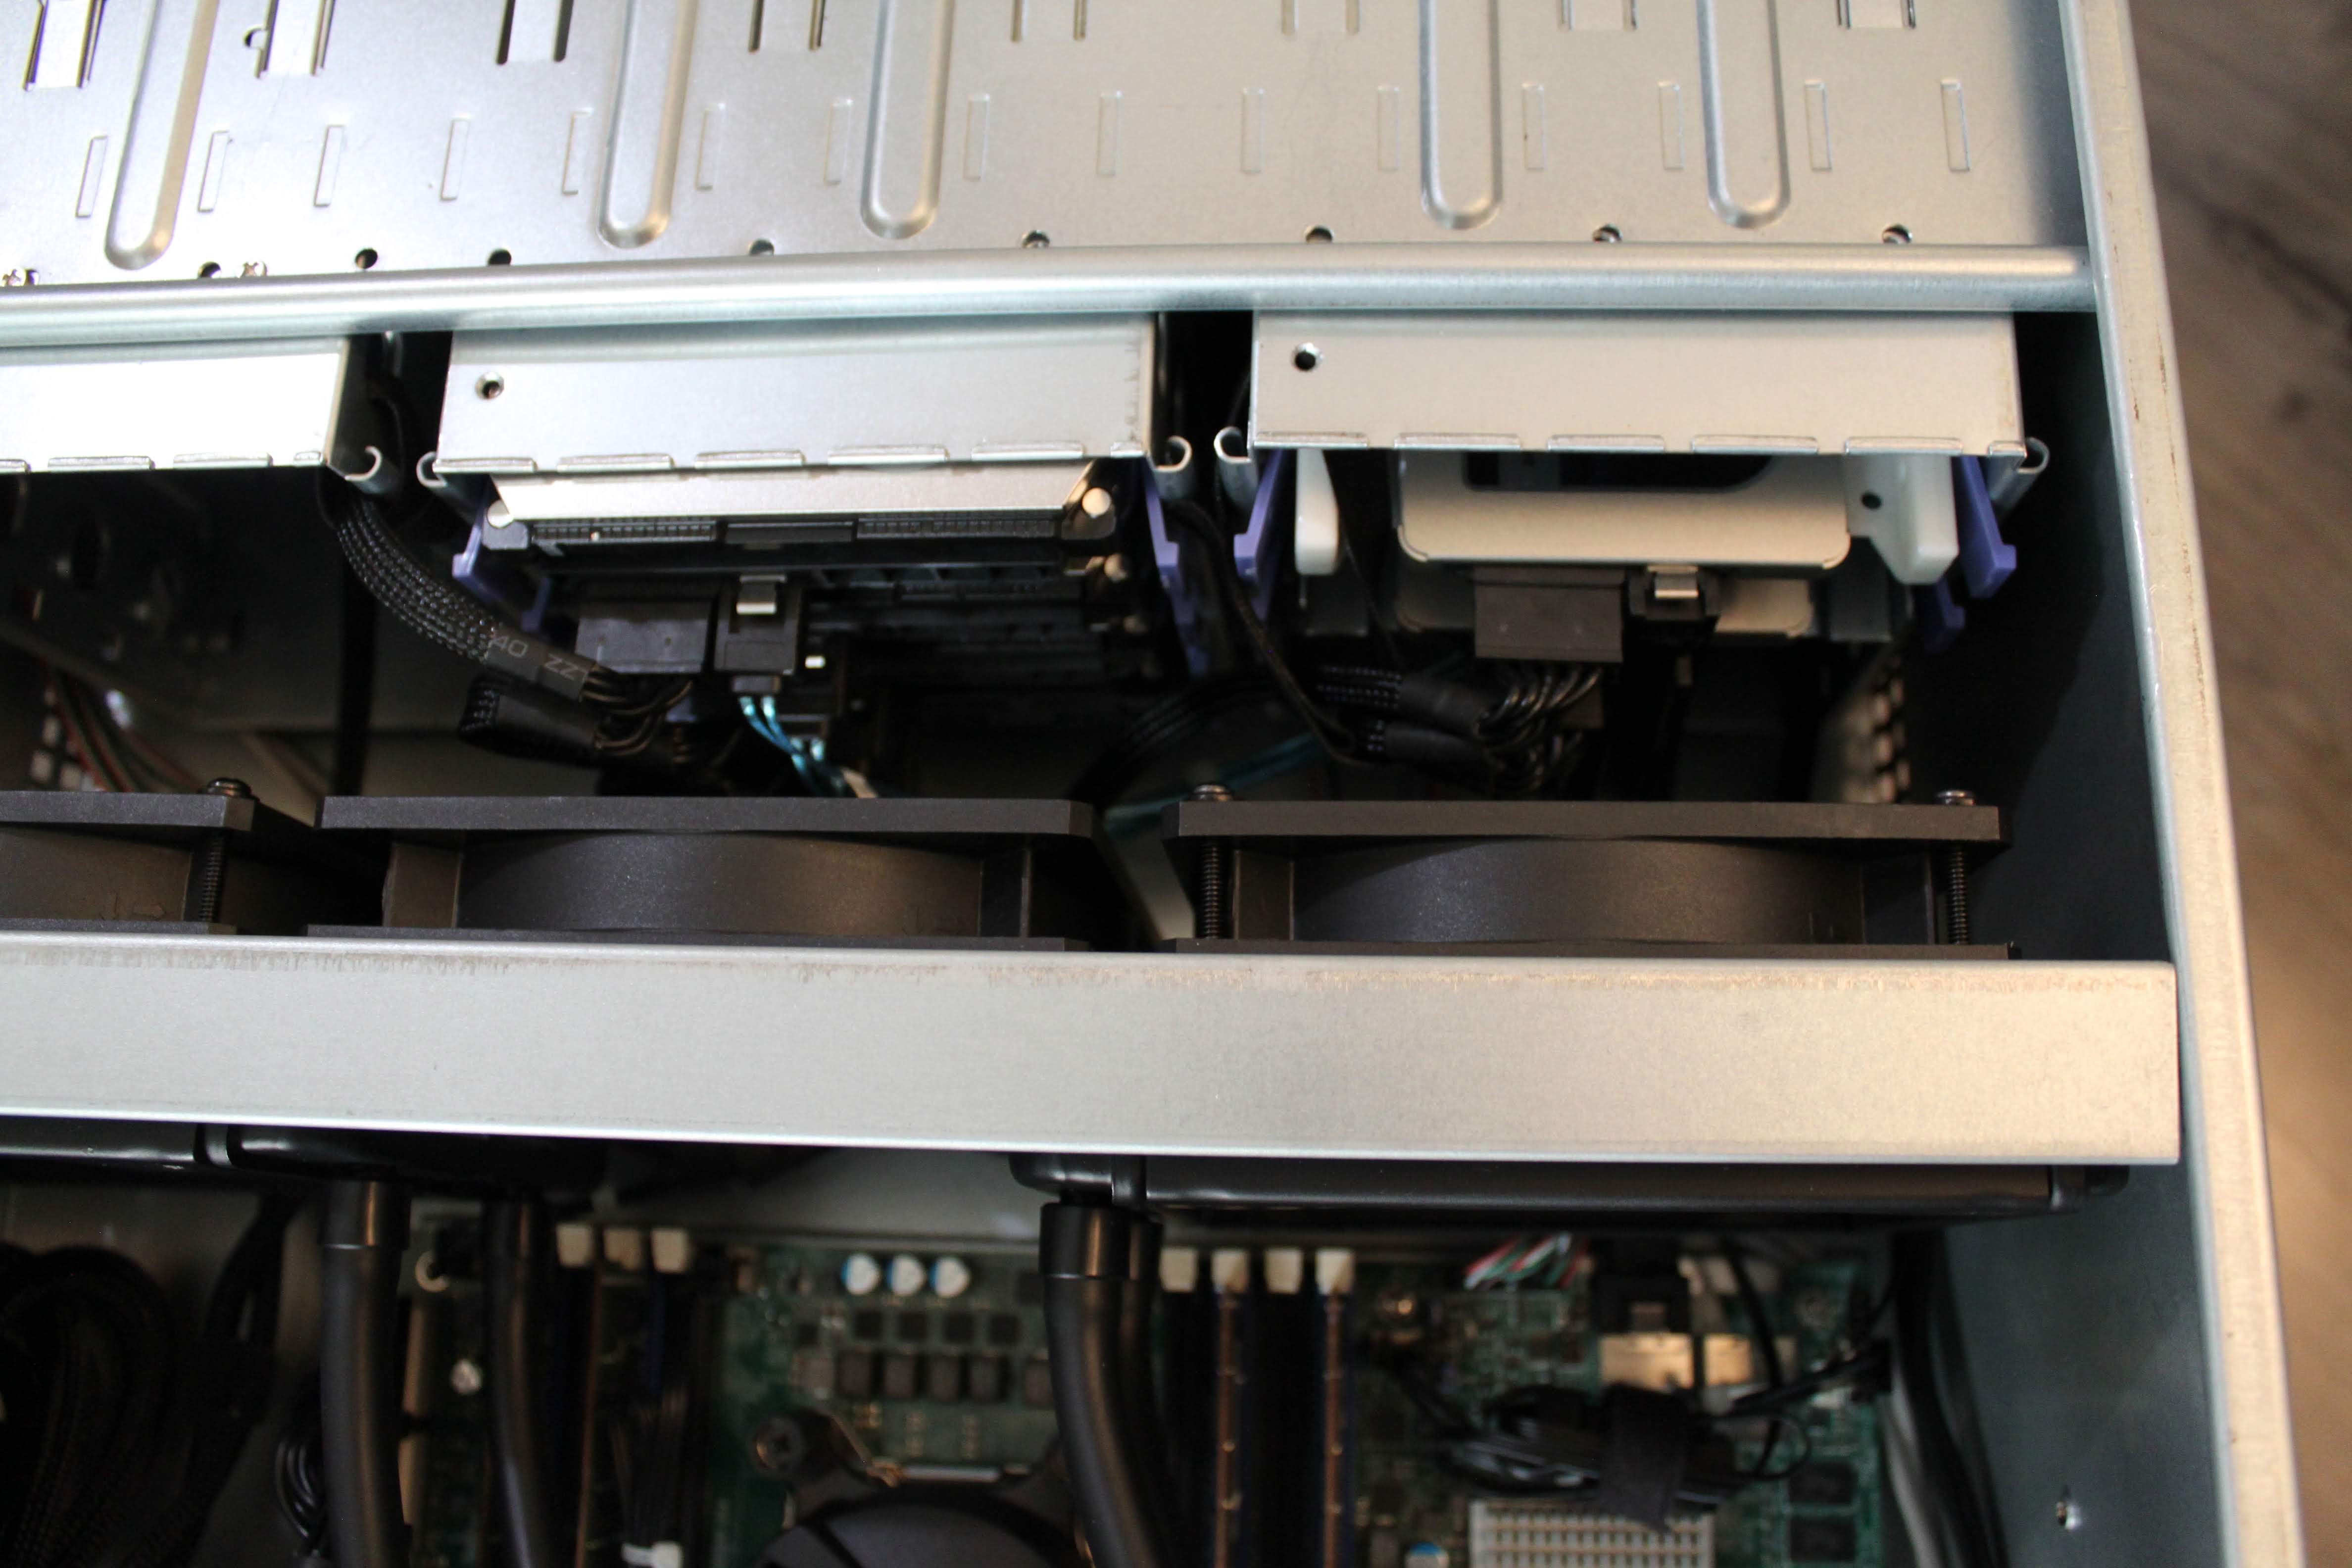
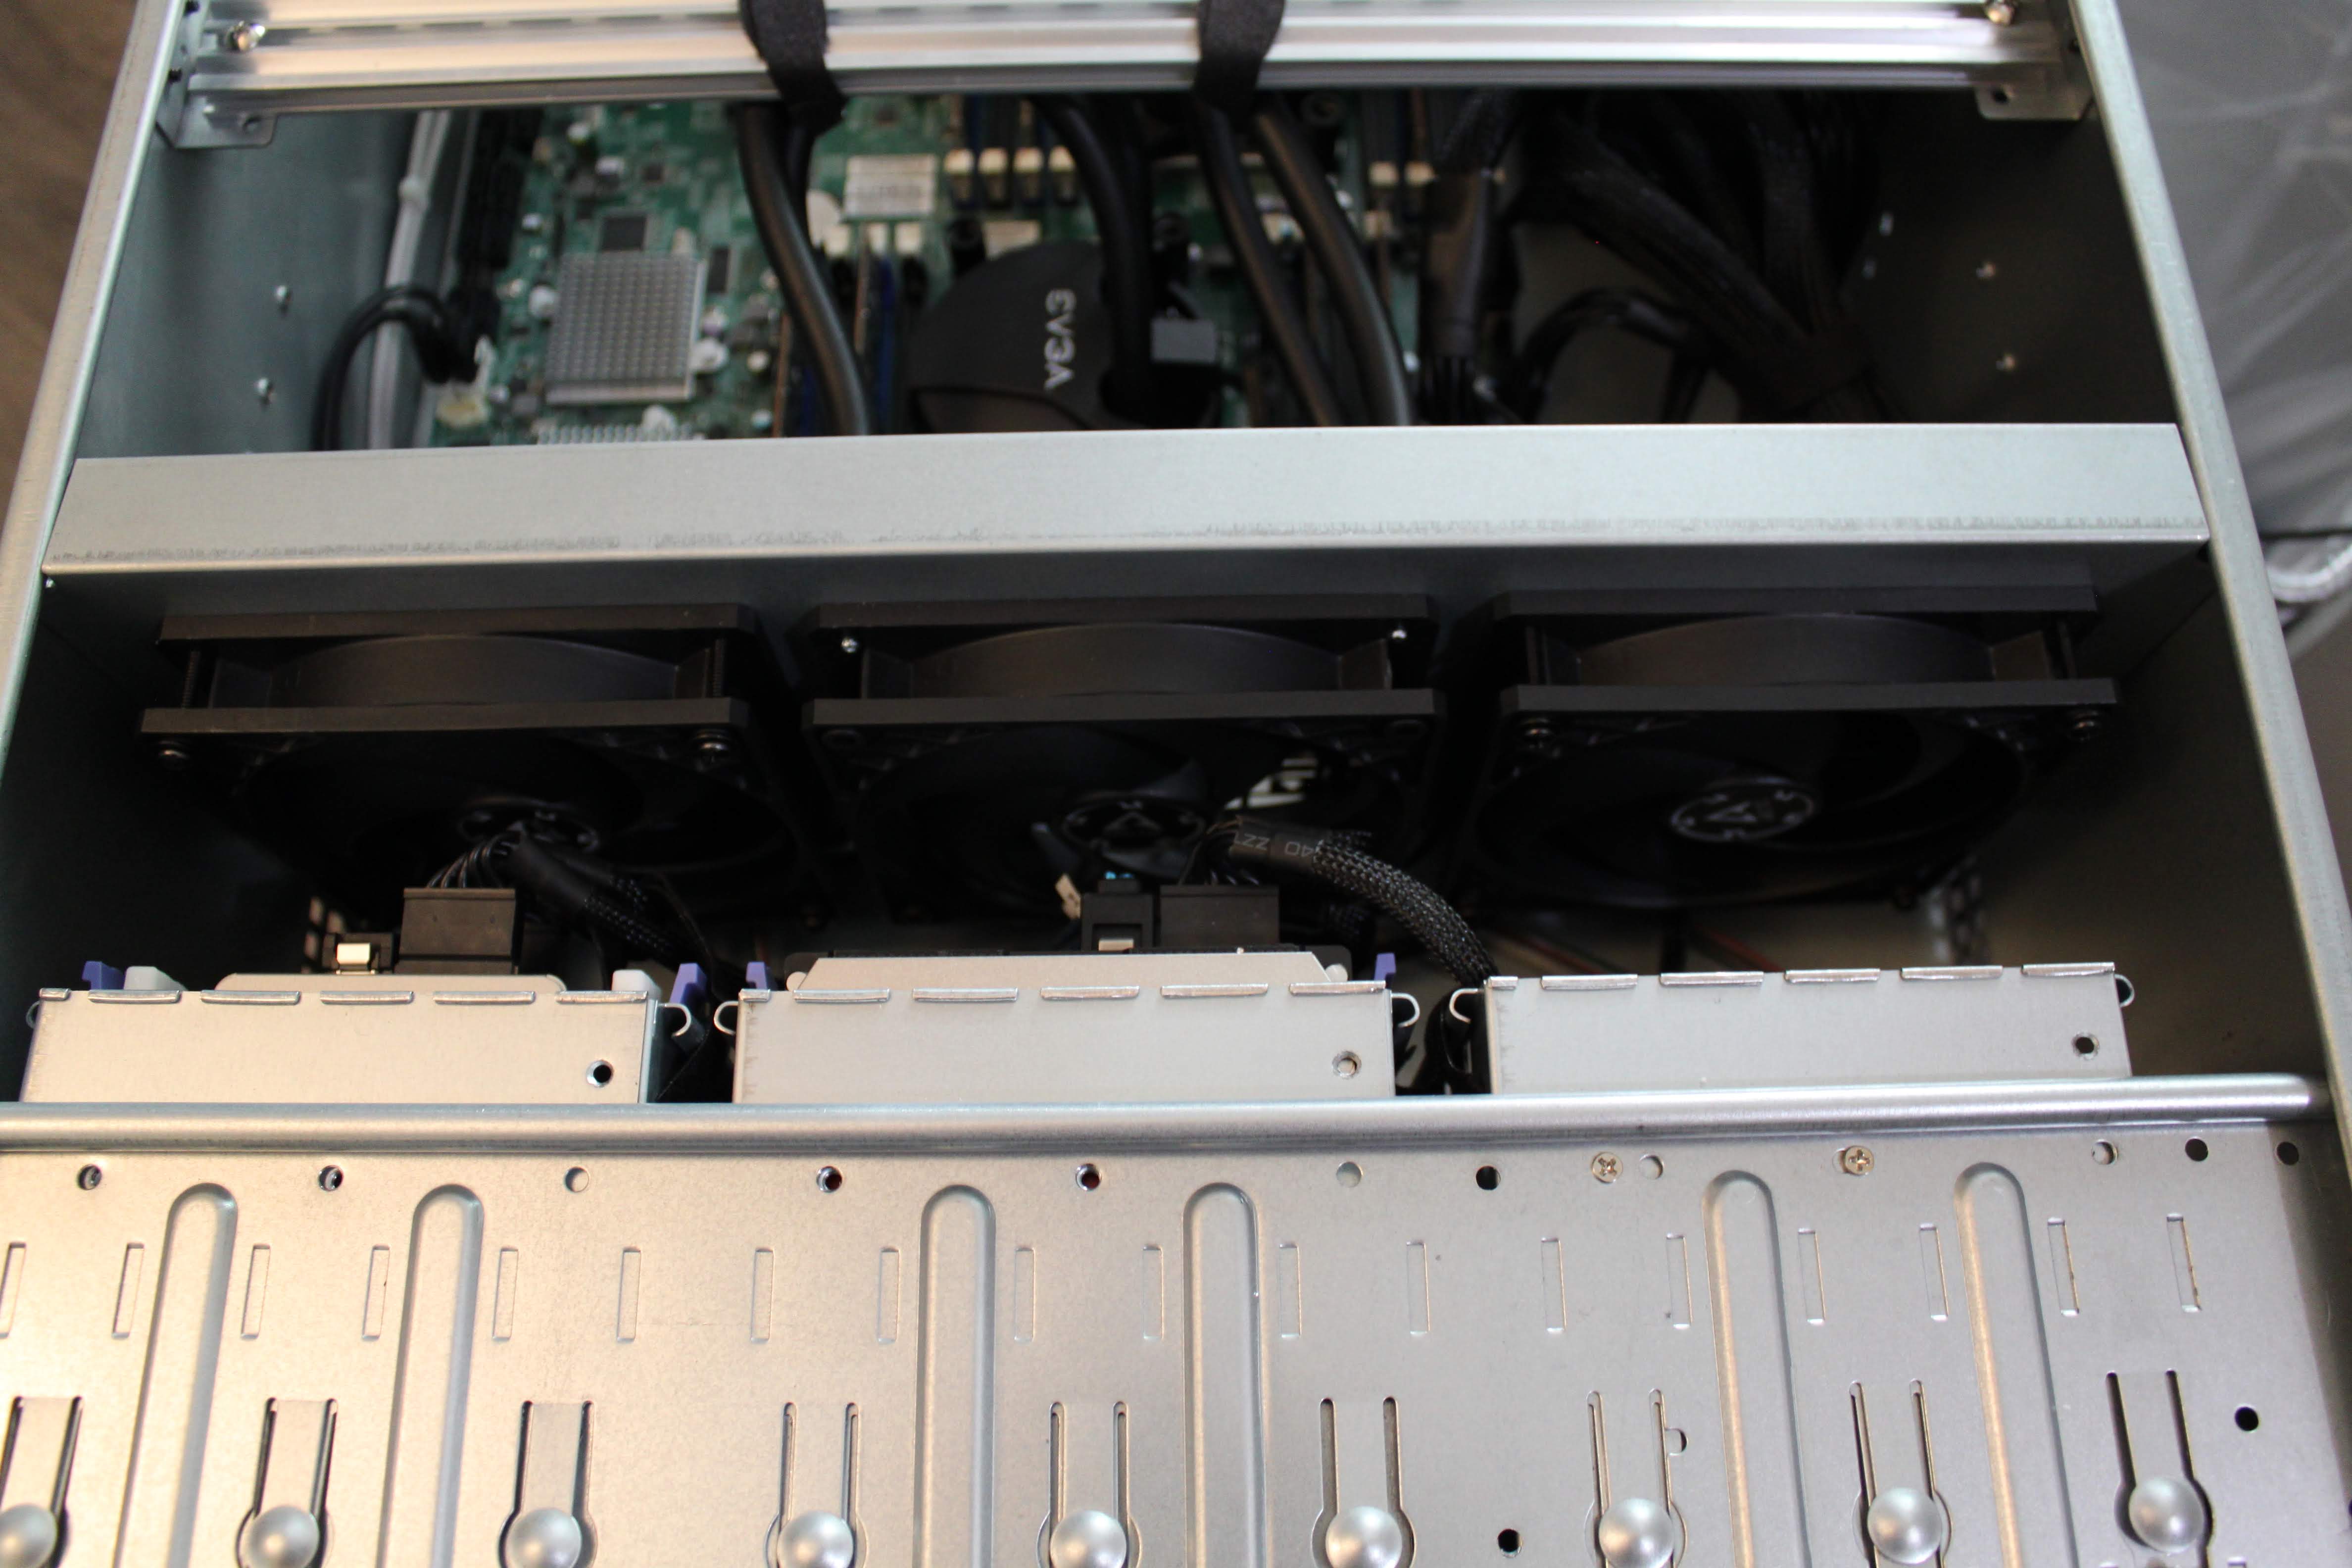
I added zip-ties to the SF8087 → SATA cables to keep them tidy and prevent them from moving too much and interfering with the fans.
Final Product
To keep things from moving around and to help with airflow, I zip-tied and velcro strapped everything to the case wherever it made sense. Even though I didn’t have to tie down the radiator hoses, I figured it would be good to just tighten them against the support rail to prevent vibration from damaging the hoses.
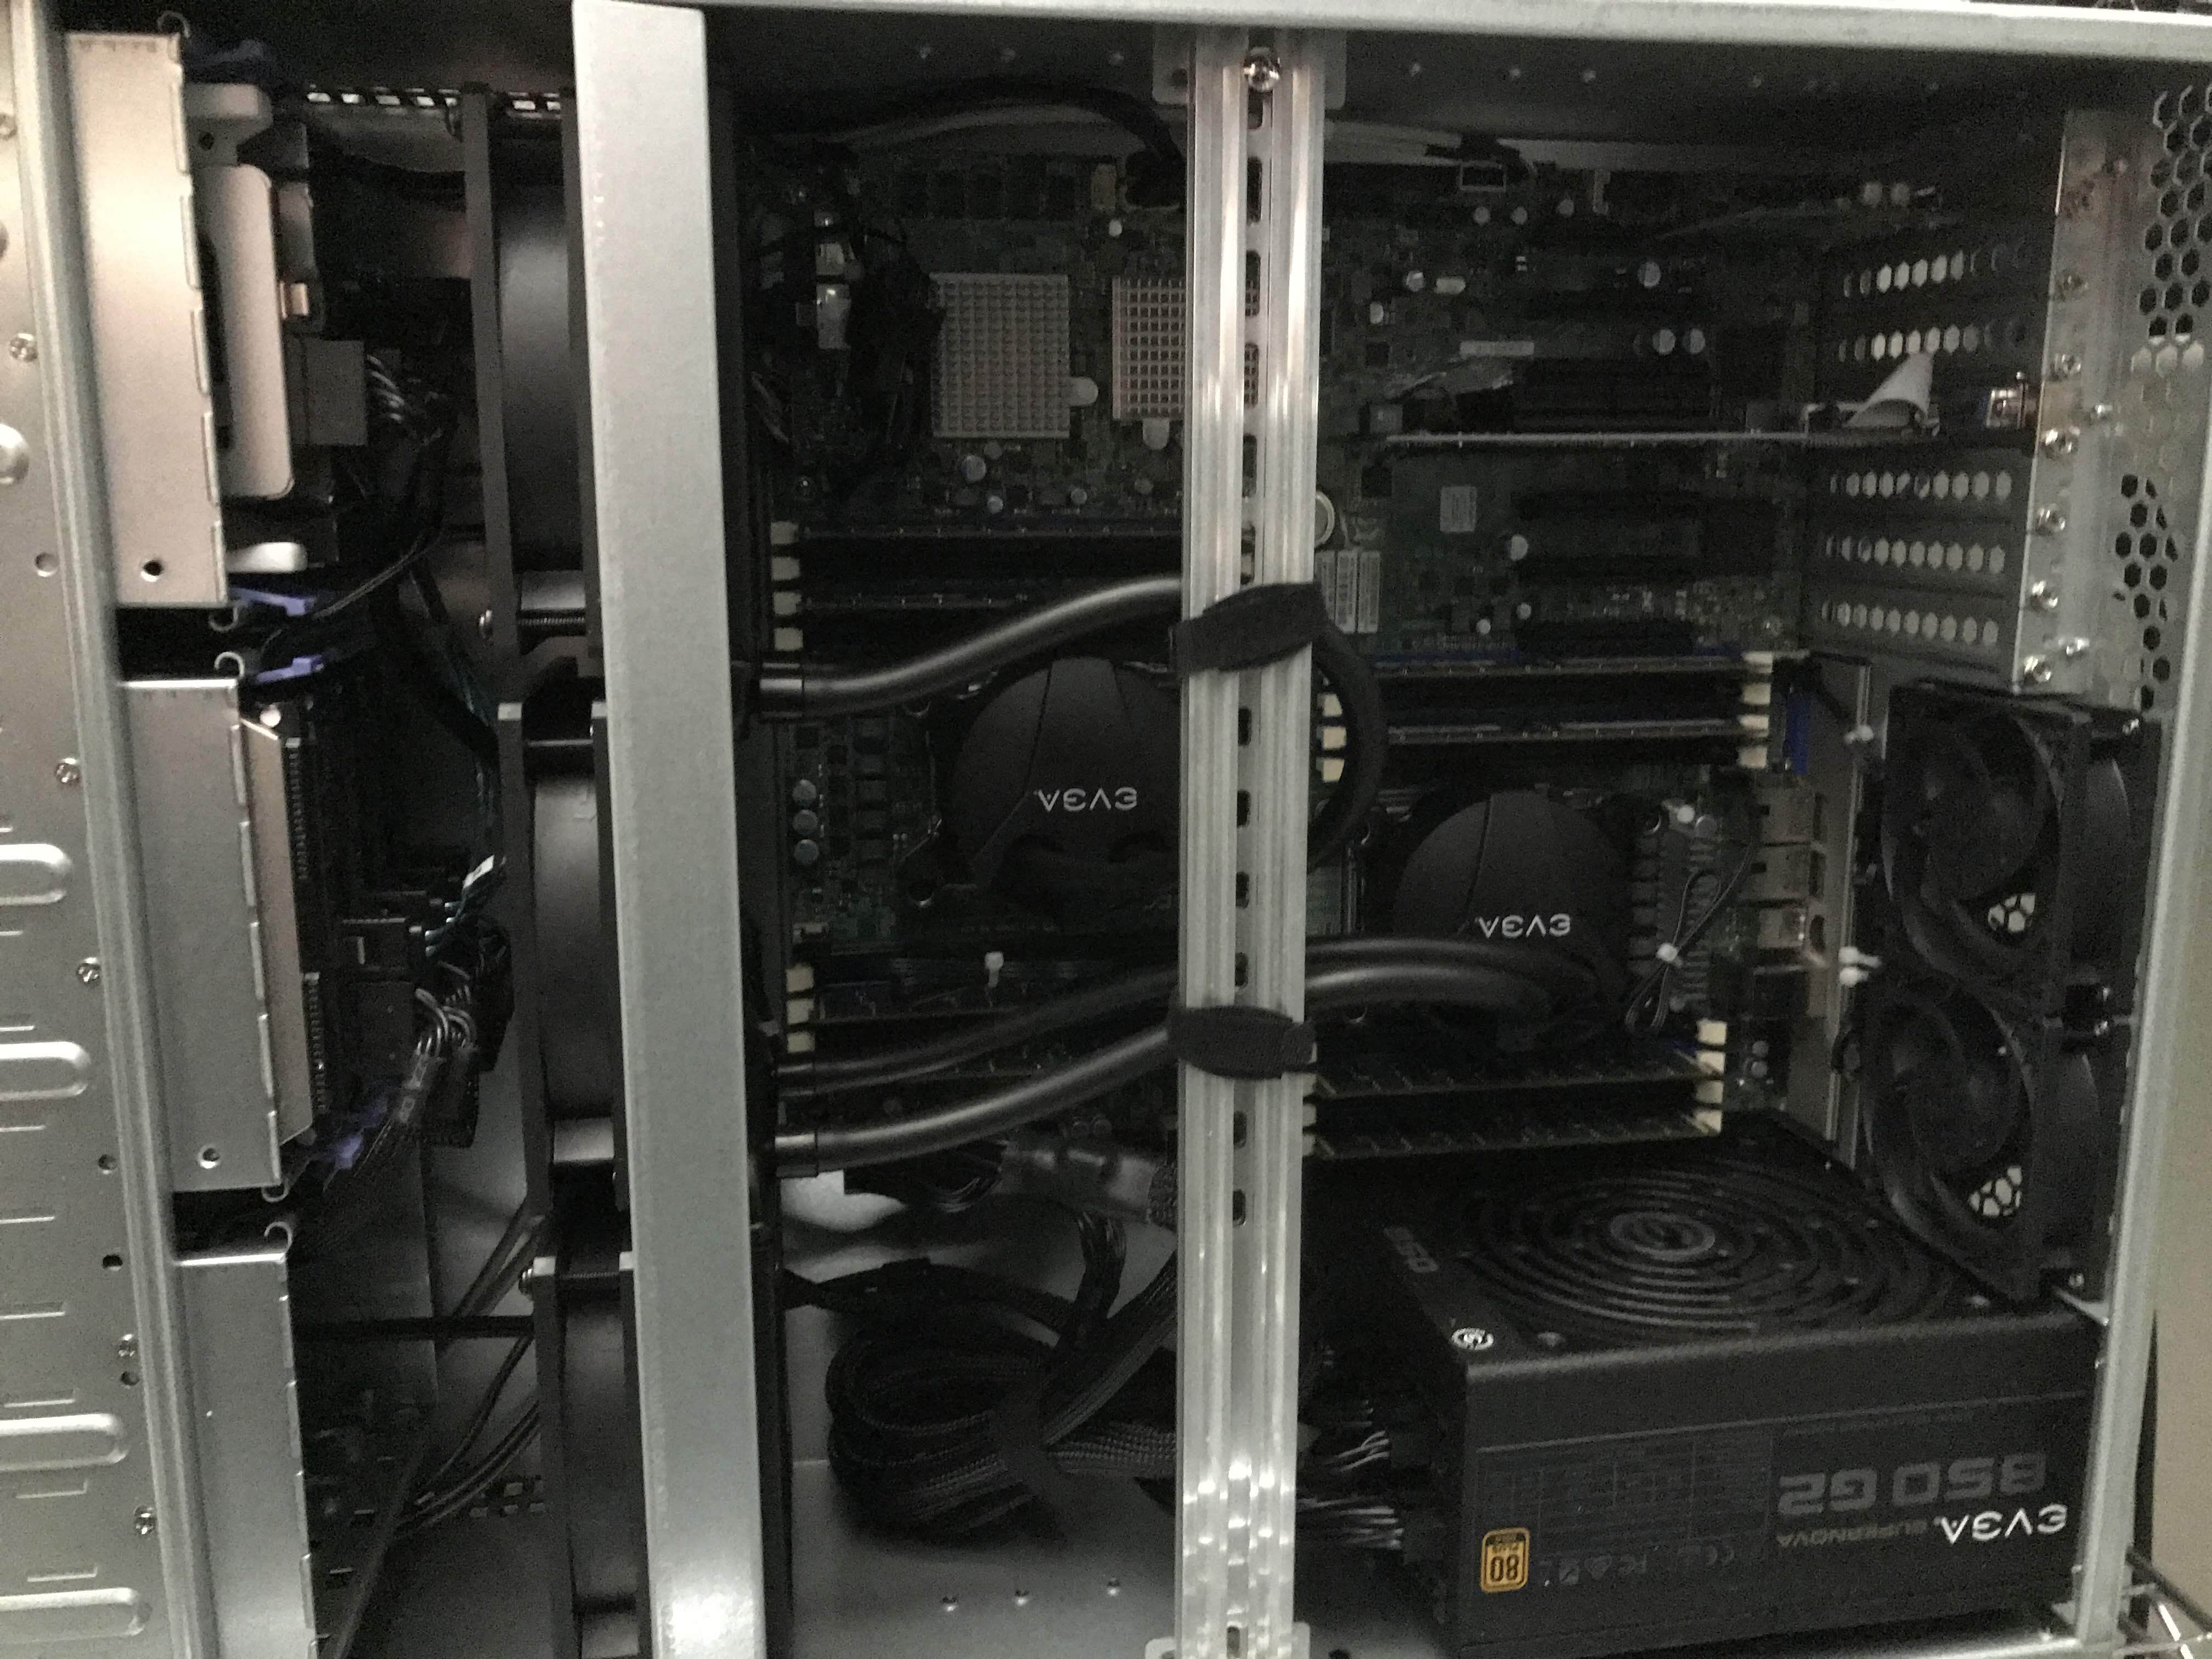
This last photo contains the complete build, including the 2 x 80mm fans.
Here’s what it looks like at idle (That’s a lot of cores ![]() )
)

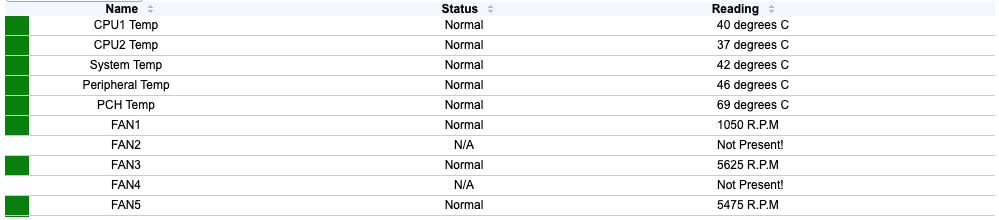
Here’s the IPMI interface displaying the temperatures and fan speeds. In a closed-door closet, it runs very cool. I have never liked how hot the LSI cards run, but apparently is well within spec.
Comparison of old to new
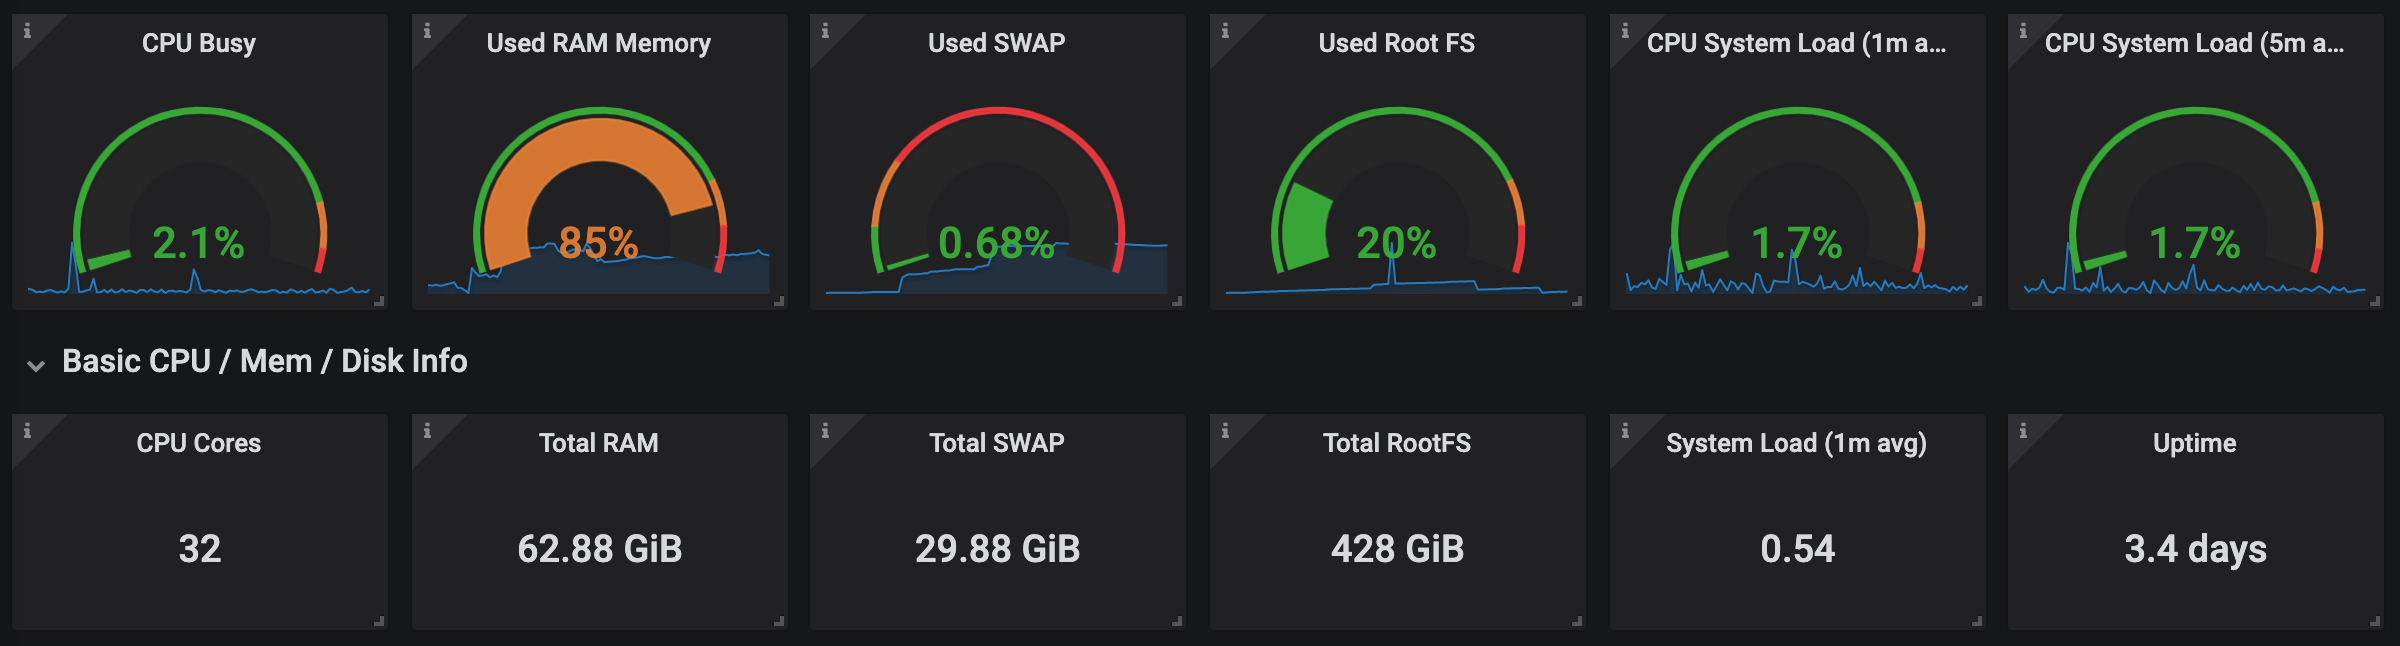
The following charts were grabbed from Grafana + Prometheus metrics collection over a 24 hour period of time.
Here’s an overview of a 24 hour period of the old system:
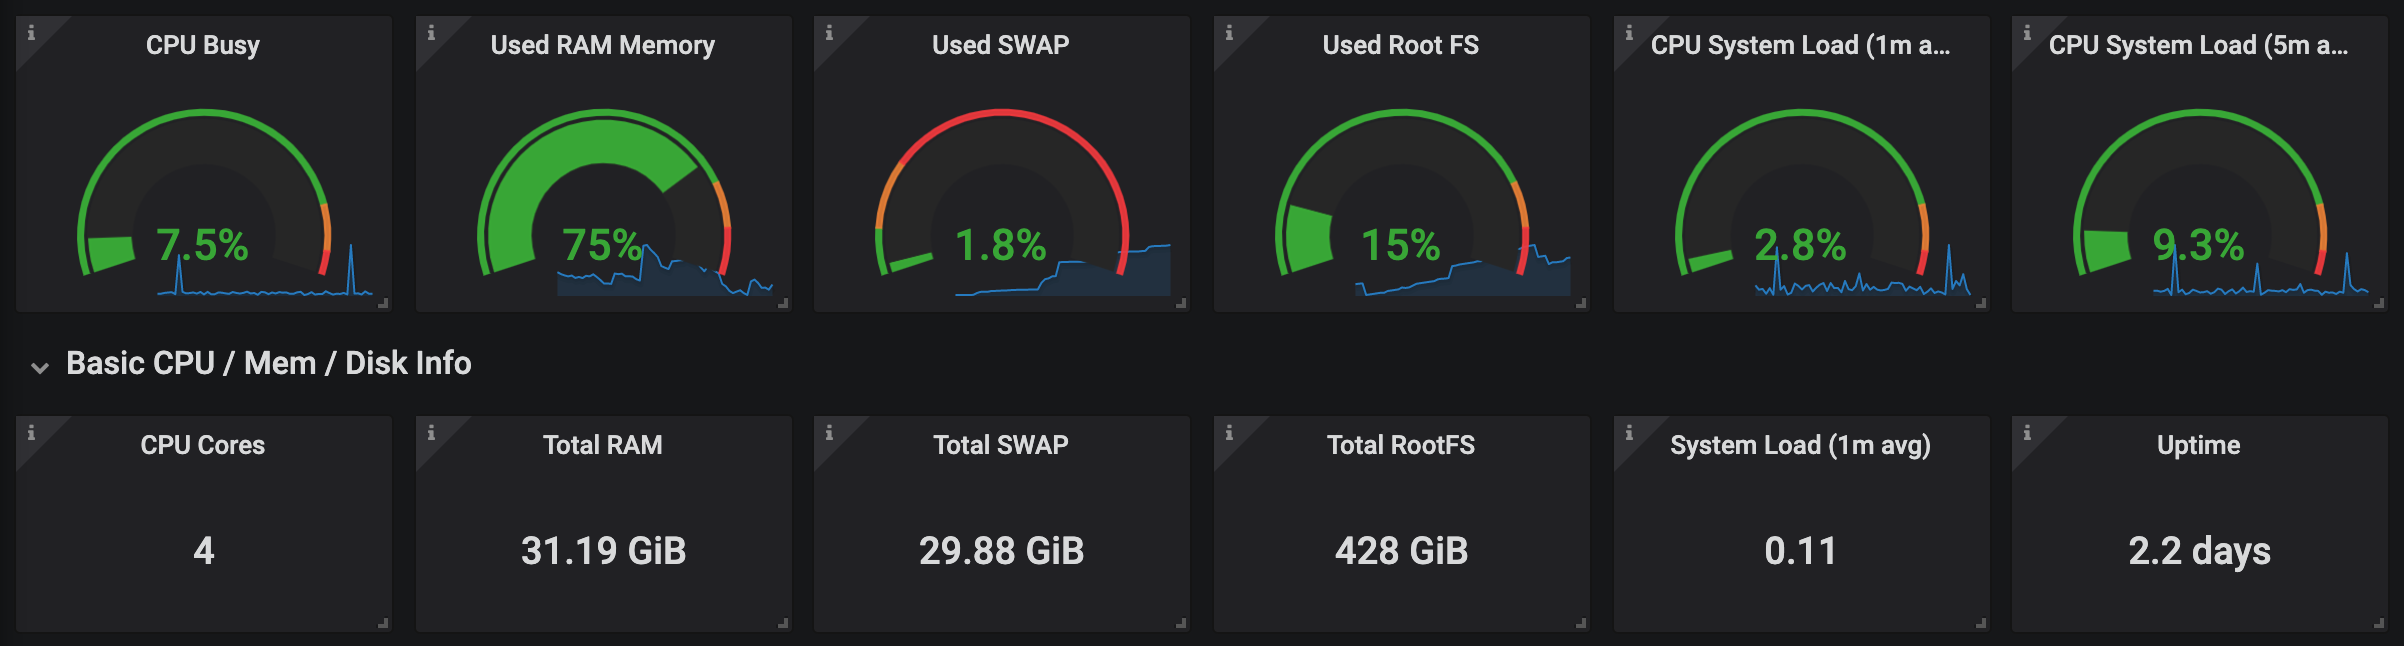
Here’s the new system (same time frame):
Now that I have more power, I can re-enable the containers and virtual machines I had to shut down to prevent the system from bus-locking and being a bit slow.
This server will likely be overkill for what I need, but will allow me to experiment with a slew of projects I have been waiting to try without having to juggle hardware or shutdown other items.
Here’s some details of what I was using before as a server:
- Case + Motherboard: Supermicro Mini Server SYS-5029S-TN2
- CPU: Intel i5-6400
- RAM: 32GB (2 x 16GB Laptop Memory, non-ECC
 )
) - OS Disks: 2 x 500GB Crucial SSDs
- Storage Disks: 4 x 8TB WD Reds (Shucked)
The new server:
Super excited to have tons of room to expand, both storage and utilization. Having IPMI is extremely useful especially for pulling simple things like sensor data, and full remote control of it while I am away from home. E.g. Sensor data via IPMI:
$ ipmitool -I lanplus -H <ipmi-ip-address> \
  -U <ipmi-username> \
  -P '<ipmi-password>' sensor

CPU1 Temp        | 40.000     | degrees C  | ok    | 0.000     | 0.000     | 0.000     | 84.000    | 87.000    | 89.000
CPU2 Temp        | 38.000     | degrees C  | ok    | 0.000     | 0.000     | 0.000     | 84.000    | 87.000    | 89.000
System Temp      | 43.000     | degrees C  | ok    | -9.000    | -7.000    | -5.000    | 80.000    | 85.000    | 90.000
Peripheral Temp  | 46.000     | degrees C  | ok    | -9.000    | -7.000    | -5.000    | 80.000    | 85.000    | 90.000
PCH Temp         | 69.000     | degrees C  | ok    | -11.000   | -8.000    | -5.000    | 90.000    | 95.000    | 100.000
FAN1             | 1050.000   | RPM        | ok    | 300.000   | 450.000   | 600.000   | 18975.000 | 19050.000 | 19125.000
FAN2             | na         |            | na    | na        | na        | na        | na        | na        | na
FAN3             | 5550.000   | RPM        | ok    | 300.000   | 450.000   | 600.000   | 18975.000 | 19050.000 | 19125.000
FAN4             | na         |            | na    | na        | na        | na        | na        | na        | na
FAN5             | 5475.000   | RPM        | ok    | 300.000   | 450.000   | 600.000   | 18975.000 | 19050.000 | 19125.000
FAN6             | 1650.000   | RPM        | ok    | 300.000   | 450.000   | 600.000   | 18975.000 | 19050.000 | 19125.000
FANA             | 1350.000   | RPM        | ok    | 300.000   | 450.000   | 600.000   | 18975.000 | 19050.000 | 19125.000
FANB             | 1275.000   | RPM        | ok    | 300.000   | 450.000   | 600.000   | 18975.000 | 19050.000 | 19125.000
VTT              | 0.992      | Volts      | ok    | 0.816     | 0.864     | 0.912     | 1.344     | 1.392     | 1.440
CPU1 Vcore       | 0.768      | Volts      | ok    | 0.480     | 0.512     | 0.544     | 1.488     | 1.520     | 1.552
CPU2 Vcore       | 0.784      | Volts      | ok    | 0.480     | 0.512     | 0.544     | 1.488     | 1.520     | 1.552
VDIMM AB         | 1.488      | Volts      | ok    | 1.104     | 1.152     | 1.200     | 1.648     | 1.696     | 1.744
VDIMM CD         | 1.504      | Volts      | ok    | 1.104     | 1.152     | 1.200     | 1.648     | 1.696     | 1.744
VDIMM EF         | 1.488      | Volts      | ok    | 1.104     | 1.152     | 1.200     | 1.648     | 1.696     | 1.744
VDIMM GH         | 1.488      | Volts      | ok    | 1.104     | 1.152     | 1.200     | 1.648     | 1.696     | 1.744
3.3V             | 3.264      | Volts      | ok    | 2.640     | 2.784     | 2.928     | 3.648     | 3.792     | 3.936
+3.3VSB          | 3.360      | Volts      | ok    | 2.640     | 2.784     | 2.928     | 3.648     | 3.792     | 3.936
5V               | 4.928      | Volts      | ok    | 4.096     | 4.288     | 4.480     | 5.504     | 5.696     | 6.912
+5VSB            | 4.928      | Volts      | ok    | 4.096     | 4.288     | 4.480     | 5.504     | 5.696     | 6.912
12V              | 12.190     | Volts      | ok    | 10.176    | 10.494    | 10.812    | 13.250    | 13.568    | 13.886
VBAT             | 3.168      | Volts      | ok    | 2.400     | 2.544     | 2.688     | 3.312     | 3.456     | 3.600
HDD Status       | 0x0        | discrete   | 0x0000| na        | na        | na        | na        | na        | na
Chassis Intru    | 0x0        | discrete   | 0x0000| na        | na        | na        | na        | na        | na
References
Final Thoughts
Feel free to ping me on Discord (spikebyte [US]) if you have any questions.
Big thanks to @Riggi @JDM_WAAAT @seanho and the many others that helped me with various troubleshooting and parts research. Such a fantastic group!