Thanks to RhinoTech for providing a review sample.
I was not paid or otherwise incentivized to make a positive review.
Overview
The Aruba IAP-207 is a 2x2:2 AC access point that has dual power capability, from either a POE (AF) or 12V 1A power adapter.
- If you need a 12V power adapter, you can find one at Amazon or on ebay.
- If you’d rather use POE, here is an 8 port switch with 4 POE ports at Amazon.
Full specifications available here from Aruba’s website.
This unit ships from RhinoTech brand new in OEM box, with wall mounting brackets included.
The unit itself has a heavy metal base plate, which is not something you would find on Ubiquiti Access Points.
Speaking of Ubiquiti Access Points, their competing model is the AC-Lite which comes in at around $26 (47%) more expensive than the IAP-207.
Note: If you’re looking to use this on a desk, it won’t lay flat due to the positioning of the ethernet and/or power supply cables. You can use the included mounting brackets to lift it up so it lays flat when on a desk. Other than that, it’s a really nice looking, compact unit. It doesn’t look like a “UFO” like Ubiquiti’s APs, more like a household device such as a smoke detector or thermostat.
Package Contents
Not much is included besides the access point.
Two mounting brackets, a manual, and a quick start guide.
No power adapter is included, but a power adapter and POE switch are linked above if you don’t have those already.
Setup
Setup was a breeze. It’s much easier than Ubiquiti models, as there is no dedicated controller needed. Simply power up the access point, plug it into your network, and connect to the “SetMeUP-xx:xx:xx” network.
This window will pop up on your device. Press “Continue”!
Type the default username “admin” and the password “admin”. Press “Log In”.
The first screen it’ll take you to is the dashboard.
Navigate to the networks tab. Add a new network. Type the network name, and press “Next”.
For a basic setup, you won’t need to change anything here. Press “Next”.
Create a secure password for your network. Press “Next”.
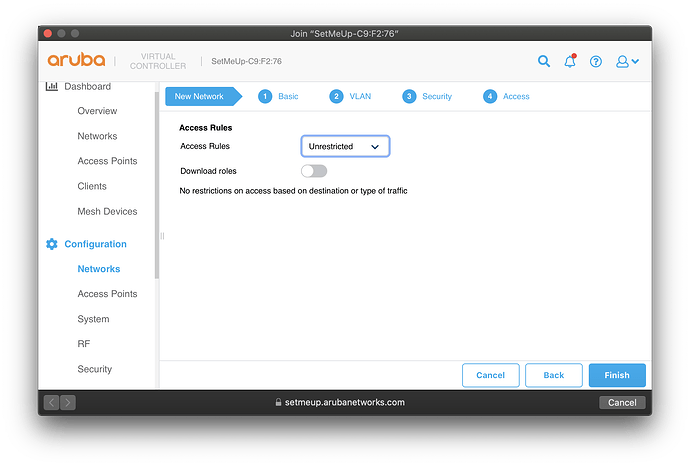
Again, for a basic setup, you won’t need to change anything here. Press “Next”.
Now, you’ll be kicked off the “SetMeUp” network and you’ll have to reconnect to the access point via the network you just set up. You’re done at this point!
If you want to access the dashboard again, simply type the IP address of your access point into your web browser, and log in with admin/admin again.
There’s a ton more you can configure here, but that’s all I’m going to cover in this mini-guide/review.
Testing
Using my 2019 16" Macbook Pro, I was able to achieve the following speeds using the “out of the box” default settings of the access point. This is from the other side of the apartment, which is 3 rooms away.
This is a great result, especially for this price. I’m sure this throughput can be increased by messing around with the settings, but considering my extremely dense airspace (apartment complex) I’m really happy with the capability of the IAP-207.
Conclusion
The Aruba IAP-207 is a no-nonsense, easy to use, and solid-performing access point.
When used in conjunction with a pfSense/Opensense or other prosumer/enterprise router, a few IAP-207 would make for an extremely robust home network.
For the low price of $55 each (including shipping)…
I wholeheartedly recommend the Aruba IAP-207.


